Showing posts with label Frosting. Show all posts

Carrot Cupcakes with Flower Fondant Decorations

I've made carrot cupcakes before. I have also made fondant roses and flowers. I  have never combined them together, so here goes!


I think it turned out ok. This is the first project, although small, I did after moving to Northern California. My new oven is slow at preheating, and never reaches the correct temperature until 20 minutes after it says it did. So I got an oven thermometer to be safe.


I made these cupcakes for my husband's new co-workers. Most of them are men, so this is kinda girly, but I felt like making flowers. So this is what they are going to get!


So, since I have made both carrot cupcakes and fondant flowers. Here are the links to them if you feel adventurous and want to try this project out!


I hope you have fun making either of the recipes.


Carrot Cupcakes


I love carrot cake. I also love cream cheese frosting. Good thing that these two things were made for each other. My husband is not fond of carrot cake, so nobody is helping me devour these yummy carrot cupcakes. I made them into cupcakes so that I can give them away. I knew ahead my husband wouldn't eat them. He's missing out!

These carrot cupcakes are moist and delicious beyond imagine. They have toasted walnuts, sweetened shredded coconut and currants in them. The currants give them a yummy chewy tangy bite when you get one. It's yummy. 


This recipe can make 1 small 7-8 inch round cake or 18-20 cupcakes. This recipe is really easy too!

Ingredients:
1 cup all purpose flour
1 tps baking soda
1 tps baking powder
1 tps ground cinnamon
1/2 tps all-spice, optional
1/2 tps salt

2 large eggs, room temp.
1 cup sugar
3/4 cup vegetable oil
1 cup (8 oz) shredded carrot
1/2 cup currants
1/2 cup walnuts, chopped and toasted
1/2 cup sweetened shredded coconut

2 cups of cream cheese frosting

Directions:
1. Combine all the dry ingredients in a bowl.
2. Beat eggs with sugar until pale. 2 minutes. Add oil, and mix until combined.
3. Add in dry ingredients. Mix well.
4. Add in carrots, currants, walnuts, and coconut. Mix well.
5. For cupcakes, fill 2/3 full and bake at 350 for 20 minutes. For 7/8 inch cake, bake for 40 minutes.
Top with cream cheese frosting on your choice!


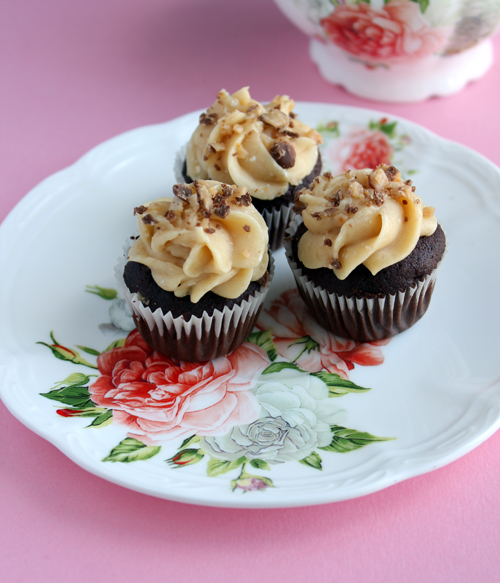
Chocolate Cupcakes with Peanut Butter Buttercream

I have to admit, this is the best chocolate cupcake recipe I've ever eaten or made. It is beyond moist, and kind of dissolves on your tongue. I've been keeping this recipe a secret for over a year, and finally decided to share it today. Because my blog's birthday is tomorrow! It's been a good 2 years sharing my recipes and secrets with you! Do enjoy!


This recipe makes about 18 standard size cupcakes. I actually made mini cupcakes this time, and got about 60. So decide what your goal quantity is. This recipe is extremely easy to make. =]


The batter in this recipe is beyond runny. It's like soupy. That's the only thing I dislike about it. If you're not careful, it could make a mess on your cupcake pans. There's my warning.

Ingredients:

Dry:
1 3/4 cup flour, all purpose or cake
2 cup sugar
3/4 cup cocoa powder
2 tps baking soda
1 tps baking powder
1 tps salt

Wet:
2 eggs
1 cup strong coffee (1 cup hot water with 2 tps instant coffee)
1 cup buttermilk
1/2 cup vegetable oil
1 Tbs vanilla extract
1 Tbs coffee liquor, optional

Directions:
Preheat oven to 350F.
1. Combine all the dry ingredients. Sift it through a sleeve into a mixing bowl.
2. Add all the wet ingredients into the bowl.
3. Using a paddle attachment, mix for 2 minutes on medium.
3. For standard cupcakes, fill 2/3 full and bake for 15-18 minutes. For mini cupcakes, fill half full and bake for 10-12 minutes.
4. Let cool. Pipe chocolate ganache into the cupcakes (optional)
5. Swirl buttercream on top. Top with shredded Reeses peanut butter cups candy.

I swear you will never make another chocolate cupcake recipe after tasting this one.


Now for the buttercream. My favorite is a swiss meringue. It's not overly sweet, and melts in your mouth. Yummy! You can use your favorite swiss meringue buttercream, and add creamy peanut butter into it, to taste. I usually add 2 heaping spoon fulls.  I use this recipe for my buttercream, half it for this recipe.


Easter Eggs Chocolate Sugar Cookies

This is my first time making chocolate sugar cookies. The taste is definitely yummy, I might never make plain vanilla sugar cookies ever again. The dark base color really makes the spring colors pop!

So today is the first day of cookie decorating for Easter. I plan to make cookies the next 3 days also, each day will be different designs and techniques. I did the same with the St. Patrick's day sugar cookies.

Today, I present hand piped Easter egg cookies. Tomorrow I will be working with rubber stamps on cookies. My goal is to make a 3D Easter egg basket sometime this week.


Anyways, I came up with 6 different Easter egg designs. You only see 5 in the photo though. Why? Because I originally came up with 5 designs. One of the design requires the wet on wet technique for royal icing. I was going to have one of the eggs have polka dots as a background. My brain must have been made of tofu, because I completely forgot about it when I was letting the icing dry.


So when I came back to it, the icings were dry. Darn. So I had to come up with a 6th design. You guys will never see the missing 5th design =[ Well, at least not this coming Easter.


This cookie in the middle here, is the 6th design.


So, this chocolate cookie is very yummy. You will love it more than my vanilla sugar cookie. It even has coffee in it, to make the chocolate extra chocolatey.

Ingredients:
2 1/2 cups all purpose flour
1/2 cup cocoa powder
1 tps instant expresso/coffee powder
1/2 tps salt
1 cup (2 sticks) butter, softened
1 cup sugar
1 large egg, room temp.
1 tps vanilla extract

Directions:
1. In a medium bowl, combine flour, cocoa powder, coffee powder, and salt. Set aside.
2. In your mixer bowl, cream together the butter and sugar until light and fluffy.
3. Add in the egg and vanilla extract. Mix until well blended.
4. With the mixer on low, add in the flour mixture. Mix well.
5. Refrigerate until firm. 2 hours or overnight.
6. Preheat oven to 350F.
7. Roll cookies and cut. Bake for 12 minutes.
8. Cool before decorating.

I made more cookies this week for Easter. 

Click the link to go see more.


Cinnamon Roll Cupcakes

I had a small birthday party this past Saturday. I was planning to make cupcakes instead of a cake for over a month now. I just didn't know what flavor to make. The horror.

So I decided to make something I'd like to eat the night before the party - cinnamon rolls. So I came up with a cinnamon roll cupcake. The guests loved it! They even took some home. 


I also made tons of other foods. I made mini New York style cheesecakes with a raspberry sauce, chocolate dipped pretzels, mini donuts, caramel popcorns, red velvet cake pops...and oh yes - savory foods too. Which included bruschetta, chipotle shrimp wonton cups, buffalo wings, and mini pretzel dogs. The beverage of choice was raspberry lemonade. 

 Of course, in the picture below, some guests have already eaten some foods before I could shoot a picture. Oh wells.


The cupcakes are actually quite easy to make. I'm sure you and your family will love them too!

CUPCAKES:
Basic Yellow Cake Recipe -> FOUND HERE Or use Yellow Cake Mix
1 Cup brown sugar
1 1/2 teaspoon ground cinnamon

Preheat the oven to 350 F. Line 24 cupcake pans with liners.

Prepare the basic yellow cake batter. Use the recipe above or store bought cake mix.
Fill each cupcake liner 1/4 full with batter. Mix the brown sugar and cinnamon in a small bowl. Sprinkle 1 teaspoon of cinnamon mixture all over the cupcake batter. 

Fill each cupcake liner again until 2/3 full, but no more. Sprinkle another teaspoon of cinnamon sugar. Using a toothpick, swirl the cinnamon sugar all over the cupcake.

Bake for 15 mins, or until a toothpick comes out clean. Cool on a rack.

FROSTING:
8 oz block of cream cheese, softened
1 stick of butter
1 teaspoon of vanilla extract
2 cups of powdered sugar

In the bowl of a mixer, using paddle attachment, cream butter with sugar until fluffy. Add cream cheese and vanilla. Beat until combined, about 2 minutes. Frost cupcakes.

GLAZE:
1 stick of butter
1 cup brown sugar
1 1/2 teaspoon cinnamon

In a small saucepan over medium heat, melt butter with sugar and cinnamon until combined and pourable, but not boiled. Let cool for a minute and drizzle over frosted cupcakes.

I hope you enjoy these cupcakes as much as my guests did.


First Year Birthday Cake

Tomorrow, March 28, marks my blog's first birthday. I baked a two tier cake for my blog! This is my first tiered cake with columns. I enjoyed making it!


During the first year, my top three favorite recipes to make and eat are:
Click for Recipes


Of course making Cake Pops was definitely an honorable mention.

I hope you guys enjoy my first year of recipes. I'm excited to continue posting new ideas and recipes in the years to come.

Opera Cake (Miniature and Bite-Size)

So, I wanted to make a cake with tons of layers. Then cut it up to petit four sizes for easy eating. I'm making these mini opera cake bites for my fiance's co-workers. It was the first cake I've made with this much layers. It was worth it, because the cake tasted super delicious. His co-workers were going crazy for these bite-size cakes.

So an opera cake is basically a coffee and chocolate cake. The flavor combination is absolutely delicious. The layers of different colors make it so pretty to look at. The cake took a long time to make, but I think it's worth it! Give it a try.


I basically followed Martha Steward's Opera Cake recipe, which can be found here. However, I didn't have any almond flour on me, so I made the cake layers with a pound cake instead.

Pound Cake:

Ingredients:
3 large eggs, room temperature
3 tablespoons milk, room temperature
1 1/2 teaspoons pure vanilla extract
1 1/2 cups (150 grams) sifted cake flour
1 teaspoon baking powder
1/4 teaspoon salt
3/4 cup (150 grams) granulated white sugar
13 tablespoons unsalted butter

Directions:
Preheat oven to 350 degrees F (177 degrees C) and place rack in center of oven. Butter or spray with a non stick vegetable spray, a large sheet pan with sides (Also known as a jelly roll pan). Line the bottom of the pan with parchment paper and butter or spray the paper.
In a medium bowl, whisk together the eggs, milk, and vanilla extract.
In the bowl of your electric mixer, with the paddle attachment (or with a hand mixer), place the dry ingredients (flour, baking powder, salt, and sugar) and mix on low speed for about 30 seconds or until blended. Add the butter and half of the egg mixture. Mix on low speed until the dry ingredients are moistened. Increase the mixer speed to medium and beat for about one minute to aerate and develop the cake's structure. Scrape down the sides of the bowl. Gradually add the remaining egg mixture, in 2 additions, beating about 30 seconds after each addition to incorporate the egg and strengthen the cake's structure.  
Scrape the batter into the prepared pan and smooth the top with an offset spatula or the back of a spoon. Bake for about 15 minutes or a toothpick comes out clean.


Look at all those beautiful layers. Cut the cake up to 1 inch squares.


Chinese New Year's Cookies

Chinese New Years is this coming Monday, so I decided to make some sugar cookies with Chinese New Years royal icing designs. They were very fun to make! I tried piping dragons for 2012, but they looked silly.

The sugar cookie recipe is delicious! I loved the taste and texture. With 2 1/2 cups of butter, it better be delicious! I found the recipe from sweetopia.

For the designs, I piped them on parchment paper. I placed the paper over a printout and traced the outline. I let them dry overnight before putting them on my cookies.


Ingredients:

2  1/2 cups butter (at room temperature)
2 cups sugar
2 large eggs
seeds from 1 vanilla bean (or 3 tsp vanilla)
5 cups flour
1 tsp baking powder
1 tsp salt
Directions:
1. Cream the butter and sugar together in the bowl of an electric mixer on low to medium speed.  (Use the paddle attachment).  Mix until thoroughly incorporated – for about one minute.  Scrape down the sides of the bowl with a plastic spatula and mix again for a few seconds more.
Over mixing the butter and sugar in this step will cause too much air to be incorporated into the dough.  If you’d like a light and fluffy cookie, that’s ideal, however the dough will spread more during baking; not ideal if you’d like the cookie to hold its shape.
2. Add eggs slowly and mix.  Scrape down the bowl with your spatula at least once and mix again.
3. Cut open your vanilla bean and scrape the seeds out.  Add to mixing bowl.  Alternatively, add liquid vanilla extract.  Stir briefly.
4. Sift your dry ingredients together.  (Flour, baking powder and salt).
5. Add all of the flour mixture to the bowl.  Place a large tea towel or two small tea towels between the edge of the bowl and the electric mixer so that the flour won’t escape.  Mix on low speed for 3o seconds.  Remove the tea towels and observe the dough mixing; when it clumps around the paddle attachment it’s ready.  It’s also important at this stage not to over mix the dough (the glutens in the flour develop and the dough can become tough).
6. Roll the dough out between 2 large pieces of parchment paper.  Place on a baking sheet and into the fridge for a minimum of 1 hour.
7. Roll out the dough further if you need to, and cut out cookie shapes.  Place on parchment paper-lined baking sheet.  Re-roll scraps and repeat.
8. Put cookie dough shapes back into the fridge for 10 minutes to 1 hour to chill again.  They will then hold their shape better when baked.
9. Preheat your oven to 350°F or 176°C.
10. Bake cookies for 8-12 minutes or until the edges become golden brown.  The baking time will depend on the size of your cookie.
11. Let cookies cool to room temperature and decorate!

Royal Icing:
Ingredients:
6 oz (3/4 cup) of warm water
5 Tablespoons Meringue Powder
1 teaspoon cream of tartar
2.25 lbs of powdered sugar
*** Note; if your meringue powder has no vanilla flavour (vanillin powder) in it, add a teaspoon of clear vanilla to this recipe.
 Directions:
In mixer bowl, pour in the warm water and the meringue powder. Mix it with a whisk by hand until it is frothy and thickened…about 30 seconds.
Add the cream of tartar and mix for 30 seconds more.
Pour in all the icing sugar at once and place the bowl on the mixer.
Using the paddle attachment on the LOWEST speed, mix slowly for a full 10 minutes. Icing will get thick and creamy.
Cover the bowl with a dampened tea-towel to prevent crusting and drying.
Tint with food colourings or thin the icing with small amounts of warm water to reach the desired consistency.

Red Velvet Heart Shaped Cake and Cupcakes

Sorry for not posting for over a month. I have a good reason. My 2 year anniversary with the boyfriend was last month. He proposed to me...and now we are engaged. So now...he is actually my fiance! =]

For our 2 year anniversary, I made him a heart shaped cake. It is red velvet. I took forever to pipe the roses on the cake. I had hours of practice, and they still don't look too good. I didn't even have time to take pretty food photos!


So the reason I took a while to start posting again is because I was busy. Busy planning our WEDDING!!! =] I've been looking up photographers, and wedding venues, to dresses. You name it. In addition to all this, I went on a diet...I started to avoid baking. Forgive me!

Here is the red velvet recipe:

Red Velvet Cake
1 1/4 cups cake flour, sifted
1 tbsp unsweetened cocoa powder
1/2 tsp salt
3/4 cups sugar
3/4 cups vegetable oil
1 large egg, room temperature
1/2 tsp red gel-paste food color
1/2 tsp pure vanilla extract
1/2 cup buttermilk
1 tsp baking soda
1 tsp distilled white vinegar

Preheat oven to 350 degrees F. Whisk together cake flour, cocoa, and salt.

With an electric mixer on med-high speed, whisk together sugar and oil until combined. Add eggs, one at a time, beating until each is incorporated, scraping down the sides of the bowl. Mix in food color and vanilla.

Reduce speed to low. add flour mixture in three batches, alternating with two additions of buttermilk, and whisk well after each. Stir together the baking soda and vinegar in a small bowl (it will foam), add mixture to the batter and mix on medium speed for 10 seconds.

Line a heart shaped 6 inch cake pan with parchment paper. Pour the batter in the pan. Bake for 30-35 minutes, or until a knife comes out clean. Transfer pan to a wire rack. Allow to cool before removing the cake from the pan.

Whipped Cream Frosting:
1 Cup of Cold Heavy Cream
1/4 Cup of Powdered Sugar, more to taste

With the whisk attached to the mixer, mix heavy cream on high for 1 minute. Add powdered sugar and continue mixing under stiff peaks form. Add more sugar to taste. Frost cake.


Red Velvet Layer Cheesecake

My boyfriend has been wanting to try a red velvet cheesecake for a while now. It would have red velvet cake layers with a New York cheesecake sandwiched in between. Yum! So I thought it would be an awesome baking adventure.


The frosting was a tad sweet for us, next time I won't add as much powdered sugar in the frosting. We're not sugar crazy people. You might actually think it's the perfect sweetness. Taste and test it as you make it!


Red Velvet Cake
2 1/2 cups cake flour, sifted
2 tbsp unsweetened cocoa powder
1 tsp salt
1 1/2 cups sugar
1 1/2 cups vegetable oil
2 large eggs, room temperature
1/2 tsp red gel-paste food color
1 tsp pure vanilla extract
1 cup buttermilk
1 1/2 tsp baking soda
2 tsp distilled white vinegar

Preheat oven to 350 degrees F. Whisk together cake flour, cocoa, and salt.

With an electric mixer on med-high speed, whisk together sugar and oil until combined. Add eggs, one at a time, beating until each is incorporated, scraping down the sides of the bowl. Mix in food color and vanilla.

Reduce speed to low. add flour mixture in three batches, alternating with two additions of buttermilk, and whisk well after each. Stir together the baking soda and vinegar in a small bowl (it will foam), add mixture to the batter and mix on medium speed for 10 seconds.

Line two 9 inch spring form pans with parchment paper. Divide the batter equally between the two pans. Bake for 30-35 minutes, or until a knife comes out clean. Transfer pans to a wire rack. Allow to cool before removing the cake from the pan. Allow to cool completely before assembling with the cheesecake.

New York Cheesecake
I used the same recipe I used in my other cheesecakes, except I cut the recipe in half. So instead of 32 oz of cream cheese, I used 16 oz and so on for all the other ingredients. I did not have a graham cracker crust on the bottom, I instead lined it with a 9 in circular parchment paper. The recipe can be found HERE!

Cream Cheese Frosting
16 oz cream cheese (3 packages), at room temperature1 stick of butter, at room temperature
1 tsp vanilla
4 cups of powdered sugar, plus more to taste

Combine all ingredients in a large mixing bowl and beat with an electronic mixer until well combined. Add more powdered sugar to taste, if a more sweet frosting is preferred. Use immediately to frost the cake.

Cinnamon Rolls

I've been wanting to make cinnamon rolls for a very long time!!! I just never found the time to make the dough, wait for it to rise, roll it out, cut it up, wait for it to rise again, and then bake it. I would need a good half a day. Luckily, today is the day!

These cinnamon rolls were super delicious! Soft and all that cinnamon sugar were divine! I covered them in a cream cheese icing, oh my yum! You must try them!!! 
Dough:
1/4-ounce package yeast
1/2 cup warm water
1/2 cup scalded milk
1/4 cup sugar
1/3 cup butter
1 teaspoon salt
1 egg
3 1/2 to 4 cups all-purpose flour

Filling:
8 ounces light brown sugar, approximately 1 cup packed
1 tablespoon ground cinnamon
Pinch salt
3/4-ounce unsalted butter, melted, approximately 1 1/2 tablespoons

Icing:
2 1/2 ounces cream cheese, softened, approximately 1/4 cup
3 tablespoons milk
5 1/2 ounces powdered sugar, approximately 1 1/2 cups

In a small bowl, dissolve yeast in warm water and set aside. In a large bowl mix milk, sugar, melted butter, salt and egg. Add 2 cups of flour and mix until smooth. Add yeast mixture. Mix in remaining flour until dough is easy to handle. Knead dough on lightly floured surface for 5 to 10 minutes. Place in well-greased bowl, cover and let rise until doubled in size, usually 1 to 1 1/2 hours.

Combine the brown sugar, cinnamon and salt in a medium bowl. Mix until well incorporated. Set aside until ready to use.

Butter a 9 by 13-inch glass baking dish. Turn the dough out onto a lightly floured work surface. Gently shape the dough into a rectangle with the long side nearest you. Roll into an 18 by 12-inch rectangle. Brush the dough with the 3/4-ounce of melted butter, leaving 1/2-inch border along the top edge. Sprinkle the filling mixture over the dough, leaving a 3/4-inch border along the top edge; gently press the filling into the dough. Beginning with the long edge nearest you, roll the dough into a tight cylinder. Firmly pinch the seam to seal and roll the cylinder seam side down. Very gently squeeze the cylinder to create even thickness. Using a serrated knife, slice the cylinder into 1 1/2-inch rolls; yielding 12 rolls. Arrange rolls cut side down in the baking dish; cover tightly with plastic wrap and let rise until dough is doubled, about 45 minutes.

Preheat the oven to 350 degrees F. Bake for about 30 minutes or until nicely browned.

While the rolls are cooling slightly, make the icing by whisking the cream cheese in the bowl of a stand mixer until creamy. Add the milk and whisk until combined. Sift in the powdered sugar, and whisk until smooth. Spread over the rolls and serve immediately.


Related Posts Plugin for WordPress, Blogger...