Showing posts with label Cake. Show all posts

Ghost Cake Pops

I found this cute Halloween themed cake pop mold at Michaels. I had to play with it and decided to make the ghost shapes.


The shapes came out just fine. They were actually quite easy to use. However, dipping them in chocolate was a different story. I had to double dip them, and even then I wasn't entirely happy - but I moved on.


I made a couple of different shapes. These ones are not dipped yet.


To make these cake pops...you will need to bake a cake.

Then crumble up the cake using your hands, or a food processor.

Then add your favorite frosting.

Just enough frosting to form a ball when rolled.
'

Then fill the mold.

Insert stick or remove.

If you need more help on making cake pops, I have an older post about cake pops here.
Or if you need cake pops tips and tricks, click here.


I will be playing with the other shapes this week. I'm happy the pumpkin will be easy to dip. =]


If you don't have or can't find this mold, even simple round balls can be made for Halloween or Fall. Like these cake pops I made with the leftover cake dough.


Carrot Cupcakes


I love carrot cake. I also love cream cheese frosting. Good thing that these two things were made for each other. My husband is not fond of carrot cake, so nobody is helping me devour these yummy carrot cupcakes. I made them into cupcakes so that I can give them away. I knew ahead my husband wouldn't eat them. He's missing out!

These carrot cupcakes are moist and delicious beyond imagine. They have toasted walnuts, sweetened shredded coconut and currants in them. The currants give them a yummy chewy tangy bite when you get one. It's yummy. 


This recipe can make 1 small 7-8 inch round cake or 18-20 cupcakes. This recipe is really easy too!

Ingredients:
1 cup all purpose flour
1 tps baking soda
1 tps baking powder
1 tps ground cinnamon
1/2 tps all-spice, optional
1/2 tps salt

2 large eggs, room temp.
1 cup sugar
3/4 cup vegetable oil
1 cup (8 oz) shredded carrot
1/2 cup currants
1/2 cup walnuts, chopped and toasted
1/2 cup sweetened shredded coconut

2 cups of cream cheese frosting

Directions:
1. Combine all the dry ingredients in a bowl.
2. Beat eggs with sugar until pale. 2 minutes. Add oil, and mix until combined.
3. Add in dry ingredients. Mix well.
4. Add in carrots, currants, walnuts, and coconut. Mix well.
5. For cupcakes, fill 2/3 full and bake at 350 for 20 minutes. For 7/8 inch cake, bake for 40 minutes.
Top with cream cheese frosting on your choice!


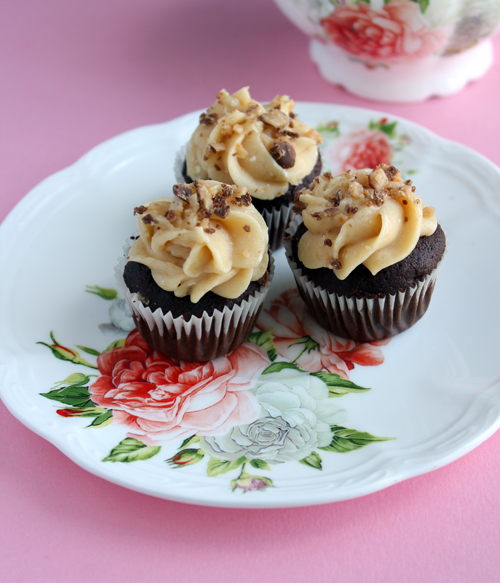
Chocolate Cupcakes with Peanut Butter Buttercream

I have to admit, this is the best chocolate cupcake recipe I've ever eaten or made. It is beyond moist, and kind of dissolves on your tongue. I've been keeping this recipe a secret for over a year, and finally decided to share it today. Because my blog's birthday is tomorrow! It's been a good 2 years sharing my recipes and secrets with you! Do enjoy!


This recipe makes about 18 standard size cupcakes. I actually made mini cupcakes this time, and got about 60. So decide what your goal quantity is. This recipe is extremely easy to make. =]


The batter in this recipe is beyond runny. It's like soupy. That's the only thing I dislike about it. If you're not careful, it could make a mess on your cupcake pans. There's my warning.

Ingredients:

Dry:
1 3/4 cup flour, all purpose or cake
2 cup sugar
3/4 cup cocoa powder
2 tps baking soda
1 tps baking powder
1 tps salt

Wet:
2 eggs
1 cup strong coffee (1 cup hot water with 2 tps instant coffee)
1 cup buttermilk
1/2 cup vegetable oil
1 Tbs vanilla extract
1 Tbs coffee liquor, optional

Directions:
Preheat oven to 350F.
1. Combine all the dry ingredients. Sift it through a sleeve into a mixing bowl.
2. Add all the wet ingredients into the bowl.
3. Using a paddle attachment, mix for 2 minutes on medium.
3. For standard cupcakes, fill 2/3 full and bake for 15-18 minutes. For mini cupcakes, fill half full and bake for 10-12 minutes.
4. Let cool. Pipe chocolate ganache into the cupcakes (optional)
5. Swirl buttercream on top. Top with shredded Reeses peanut butter cups candy.

I swear you will never make another chocolate cupcake recipe after tasting this one.


Now for the buttercream. My favorite is a swiss meringue. It's not overly sweet, and melts in your mouth. Yummy! You can use your favorite swiss meringue buttercream, and add creamy peanut butter into it, to taste. I usually add 2 heaping spoon fulls.  I use this recipe for my buttercream, half it for this recipe.


Valentine's Day Cake, Cookies, and Cake Pops

I made a 2 tiered cake, several sugar cookies, and about a dozen and a half cake pops for my husband's co-workers this week.


Back of the cake:

That fondant ruffle edge or cap on top of the first tier was pretty fun to make. It was my first time making anything ruffle, and I decided to do a ruffle top.

I have a tutorial on how to make the fondant roses here: Fondant Roses Tutorial


I love birds. They are my favorite animal. Recently, I'm beginning to like owls. So here is a cupid owl. I have other Valentine's day cookie designs on my camera still, to be posted after valentine's day.


Cake pops in a bouquet.


Baptism and Birthday Cake, Cookies, and Cake Pops

So the big order I was working on this week was finished yesterday. It was quite enjoyable making every thing, and I actually didn't freak out or stress at all during the process.

I was given 4 photos, and I had to replicate the 2 cakes, 3 dozen cookies, and 3 dozen cake pops to match the photos. So I didn't make any of the designs, just merely replicate.

Here is the baptism / christening cake:

Front of Cake

Back of Cake

The birthday cake design I had to replicate isn't my favorite. I think the top tier is kinda boring, I would improve it if I were the designer. I think the silhouette of cookie shapes on the top tier is ugly.

Here is the birthday cake:

Front of Cake

Back of Cake

I had to make 3 dozen cake pops, in 3 different designs. I did not have difficulty dipping them, because I learned about a new ingredient that makes the chocolate thin. It's called paramount crystals. They are my new best friends.


I posted about the cookies already, but here they are again.


Cinnamon Roll Cupcakes

I had a small birthday party this past Saturday. I was planning to make cupcakes instead of a cake for over a month now. I just didn't know what flavor to make. The horror.

So I decided to make something I'd like to eat the night before the party - cinnamon rolls. So I came up with a cinnamon roll cupcake. The guests loved it! They even took some home. 


I also made tons of other foods. I made mini New York style cheesecakes with a raspberry sauce, chocolate dipped pretzels, mini donuts, caramel popcorns, red velvet cake pops...and oh yes - savory foods too. Which included bruschetta, chipotle shrimp wonton cups, buffalo wings, and mini pretzel dogs. The beverage of choice was raspberry lemonade. 

 Of course, in the picture below, some guests have already eaten some foods before I could shoot a picture. Oh wells.


The cupcakes are actually quite easy to make. I'm sure you and your family will love them too!

CUPCAKES:
Basic Yellow Cake Recipe -> FOUND HERE Or use Yellow Cake Mix
1 Cup brown sugar
1 1/2 teaspoon ground cinnamon

Preheat the oven to 350 F. Line 24 cupcake pans with liners.

Prepare the basic yellow cake batter. Use the recipe above or store bought cake mix.
Fill each cupcake liner 1/4 full with batter. Mix the brown sugar and cinnamon in a small bowl. Sprinkle 1 teaspoon of cinnamon mixture all over the cupcake batter. 

Fill each cupcake liner again until 2/3 full, but no more. Sprinkle another teaspoon of cinnamon sugar. Using a toothpick, swirl the cinnamon sugar all over the cupcake.

Bake for 15 mins, or until a toothpick comes out clean. Cool on a rack.

FROSTING:
8 oz block of cream cheese, softened
1 stick of butter
1 teaspoon of vanilla extract
2 cups of powdered sugar

In the bowl of a mixer, using paddle attachment, cream butter with sugar until fluffy. Add cream cheese and vanilla. Beat until combined, about 2 minutes. Frost cupcakes.

GLAZE:
1 stick of butter
1 cup brown sugar
1 1/2 teaspoon cinnamon

In a small saucepan over medium heat, melt butter with sugar and cinnamon until combined and pourable, but not boiled. Let cool for a minute and drizzle over frosted cupcakes.

I hope you enjoy these cupcakes as much as my guests did.


First Year Birthday Cake

Tomorrow, March 28, marks my blog's first birthday. I baked a two tier cake for my blog! This is my first tiered cake with columns. I enjoyed making it!


During the first year, my top three favorite recipes to make and eat are:
Click for Recipes


Of course making Cake Pops was definitely an honorable mention.

I hope you guys enjoy my first year of recipes. I'm excited to continue posting new ideas and recipes in the years to come.

Opera Cake (Miniature and Bite-Size)

So, I wanted to make a cake with tons of layers. Then cut it up to petit four sizes for easy eating. I'm making these mini opera cake bites for my fiance's co-workers. It was the first cake I've made with this much layers. It was worth it, because the cake tasted super delicious. His co-workers were going crazy for these bite-size cakes.

So an opera cake is basically a coffee and chocolate cake. The flavor combination is absolutely delicious. The layers of different colors make it so pretty to look at. The cake took a long time to make, but I think it's worth it! Give it a try.


I basically followed Martha Steward's Opera Cake recipe, which can be found here. However, I didn't have any almond flour on me, so I made the cake layers with a pound cake instead.

Pound Cake:

Ingredients:
3 large eggs, room temperature
3 tablespoons milk, room temperature
1 1/2 teaspoons pure vanilla extract
1 1/2 cups (150 grams) sifted cake flour
1 teaspoon baking powder
1/4 teaspoon salt
3/4 cup (150 grams) granulated white sugar
13 tablespoons unsalted butter

Directions:
Preheat oven to 350 degrees F (177 degrees C) and place rack in center of oven. Butter or spray with a non stick vegetable spray, a large sheet pan with sides (Also known as a jelly roll pan). Line the bottom of the pan with parchment paper and butter or spray the paper.
In a medium bowl, whisk together the eggs, milk, and vanilla extract.
In the bowl of your electric mixer, with the paddle attachment (or with a hand mixer), place the dry ingredients (flour, baking powder, salt, and sugar) and mix on low speed for about 30 seconds or until blended. Add the butter and half of the egg mixture. Mix on low speed until the dry ingredients are moistened. Increase the mixer speed to medium and beat for about one minute to aerate and develop the cake's structure. Scrape down the sides of the bowl. Gradually add the remaining egg mixture, in 2 additions, beating about 30 seconds after each addition to incorporate the egg and strengthen the cake's structure.  
Scrape the batter into the prepared pan and smooth the top with an offset spatula or the back of a spoon. Bake for about 15 minutes or a toothpick comes out clean.


Look at all those beautiful layers. Cut the cake up to 1 inch squares.


Superbowl Football Cake Pops

So these are made with the same recipe I always use. Which can be found here.


Shaping the cake pops into a football is a little different then just regular balls. I do roll them into balls first and then roll half of the ball gently until an edge form. I repeat with the other side. I use my fingers to help pinch them pointy.

I hope everyone has a great super bowl this year. May the best team win!


Cake Pops Tips and Tricks

My fiance invited me to his co-workers house the other night to play tons of boardgames. I volunteered to make cake pops for everyone. I learned a few tricks and tips to making cake pops more easy, since I made tons.


1. Use a styrofoam block to hold the pops after dipping. Attempting to hold it in a cup will make it dry and tilt sideways. Not very pretty.
2. Unless your making cake pops in the hundreds, I recommend melting the chocolate in a cup. A cup wide enough to fit the cake balls easily, and deep enough to cover the entire ball. A double boiler could be used, but I would probably be making hundreds for that method.
3. Dip the stick in some chocolate before pushing it into the ball. Allow it to cool in the refrigerator for at least 10 minutes. This will make dipping so much more easy!
4. While the cake pop is still wet after dipping, sprinkle on some confetti or sprinkles. If you're slow, the chocolate will dry and the sprinkles won't stick.
5. Leave some dipped cake pops blank. You can change chocolate colors afterwards and drizzle pretty lines all around.
6. Put melted chocolate in a piping bag or parchment paper bag and pipe beautiful designs. This gives you more control on how your cake pops will look if you hate drizzles.
7. I like using high cocoa chocolate. It melts better and dips wayyyy better. White chocolate is hard to work with, in my opinion. I would recommend using candy melts for colors pops not in brown and white.
8. Always shake off excess chocolate after dipping. It will dry better. Otherwise the extra chocolate will drip down the stick while drying.
9. If you have a helper, use her/him. After you dip the pop, hand the stick immediately to them. They can do sprinkles or poke it in the styrofoam for you, allowing you more time to dip more pops before the chocolate dries out.
10. If you don't have a cake pop holder to present your cake pops. Consider using the styrofoam block to carry your pops around. You can wrap the block in gift wrapping paper first. OR use mini cupcake liners and put each pop on a liner in a tray.


I hope these tips and tricks help you make beautiful cake pops!
If you don't know how to make cake pops, here is my previous blog on how to:


Red Velvet Heart Shaped Cake and Cupcakes

Sorry for not posting for over a month. I have a good reason. My 2 year anniversary with the boyfriend was last month. He proposed to me...and now we are engaged. So now...he is actually my fiance! =]

For our 2 year anniversary, I made him a heart shaped cake. It is red velvet. I took forever to pipe the roses on the cake. I had hours of practice, and they still don't look too good. I didn't even have time to take pretty food photos!


So the reason I took a while to start posting again is because I was busy. Busy planning our WEDDING!!! =] I've been looking up photographers, and wedding venues, to dresses. You name it. In addition to all this, I went on a diet...I started to avoid baking. Forgive me!

Here is the red velvet recipe:

Red Velvet Cake
1 1/4 cups cake flour, sifted
1 tbsp unsweetened cocoa powder
1/2 tsp salt
3/4 cups sugar
3/4 cups vegetable oil
1 large egg, room temperature
1/2 tsp red gel-paste food color
1/2 tsp pure vanilla extract
1/2 cup buttermilk
1 tsp baking soda
1 tsp distilled white vinegar

Preheat oven to 350 degrees F. Whisk together cake flour, cocoa, and salt.

With an electric mixer on med-high speed, whisk together sugar and oil until combined. Add eggs, one at a time, beating until each is incorporated, scraping down the sides of the bowl. Mix in food color and vanilla.

Reduce speed to low. add flour mixture in three batches, alternating with two additions of buttermilk, and whisk well after each. Stir together the baking soda and vinegar in a small bowl (it will foam), add mixture to the batter and mix on medium speed for 10 seconds.

Line a heart shaped 6 inch cake pan with parchment paper. Pour the batter in the pan. Bake for 30-35 minutes, or until a knife comes out clean. Transfer pan to a wire rack. Allow to cool before removing the cake from the pan.

Whipped Cream Frosting:
1 Cup of Cold Heavy Cream
1/4 Cup of Powdered Sugar, more to taste

With the whisk attached to the mixer, mix heavy cream on high for 1 minute. Add powdered sugar and continue mixing under stiff peaks form. Add more sugar to taste. Frost cake.


Cake Pops

My boyfriend's company has a monthly BBQ party on Fridays. I decided to make cake pops, since nobody really likes dealing with cake cutting and plating. Most of the people at the party are guys. =]

So I decided to make bite size cake pops. Easy to eat, and you don't have to deal with cutting cake!

This is an extremely easy recipe. A tad time consuming, but is very worth it!


Recipe:

Ingredients:
  • 1 box cake mix (bake as directed on box for 13 X 9 cake)
  • 1 16 oz can of readymade frosting
  • Wax paper
  • Baking sheets
  • Paper lollipop sticks
  • Styrofoam block
  • Candy melts, or chocolate
  • Assorted color sprinkles
Directions:
1. Bake the cake as directed. After cake is cooked and cooled completely, crumble into a large bowl.
2. With a large spoon, mix thoroughly with about 3/4 of the can of frosting. You won't need the rest.
3. Roll mixture into quarter-size cake balls and place on a wax paper-covered baking sheet. (I used a cookie scoop to get uniform ball sizes.)
4. Place cake balls in the freezer for about 15 minutes to firm up. Transfer them to the refrigerator to keep chilled and to avoid freezing.
5. Melt candy/chocolate over a double boiler, or microwave if desired. Using enough candy melts to fill a deep bowl.
6. Remove a couple of cake balls from the refrigerator at a time to work with.
7. Dip the tip of a lollipop stick into the melted coating and insert into the bottom of cake ball.
8. Then dip in the bowl of candy/chocolate coating and remove in one motion without stirring. Make sure the entire cake ball is covered. Using a deep bowl is helpful here. If your coating is too thick, you can add a few drops of vegetable oil or shortening to help thin it and make it easier to work with.
9. Remove and allow any excess coating to fall off the pop and back into the bowl.
10. Work quickly with one cake pop at a time and before the coating sets, sprinkle color sprinkles on cake pop.
11. Place in a styrofoam block to dry. Enjoy.


Angel Food Cake

I've been gaining weight...mostly from eating too much good food (aka baked sweets). I can't help it...dessert is so good!!!

So I finally decided to bake an Angel Food Cake. No fat! Yay! Hopefully I won't be gaining anymore pounds. =]

I didn't have time to snap a photo of the cake I made....but it turned out super beautiful. Tall and so airy! I used a tube pan (angel cake pan) that was 4 inches in height...the cake was sooo tall I wish I had a 5 in or 6 in one instead! It didn't have enough height to climb, but don't worry, it did not fall over. I borrowed this photo from Pennies on a Platter, but used a different recipe!


Recipe:

Ingredients
  • 1 3/4 cups sugar
  • 1/4 teaspoon salt
  • 1 cup cake flour, sifted
  • 12 egg whites (the closer to room temperature the better)
  • 1/3 cup warm water
  • 1 teaspoon vanilla extract
  • 1 1/2 teaspoons cream of tartar
Directions
Preheat oven to 350 degrees F.
In a food processor spin sugar about 2 minutes until it is superfine. Sift half of the sugar with the salt the cake flour, setting the remaining sugar aside.
In a stand mixer bowl, combine egg whites, water, vanilla extract, and cream of tartar. Using the whisk head, mix until foamy on medium. Slowly sift the reserved sugar, beating continuously at medium speed. Once you have achieved medium peaks, sift enough of the flour mixture in to dust the top of the foam. Using a spatula fold in gently. Continue until all of the flour mixture is incorporated.
Carefully spoon mixture into an ungreased tube pan. LET ME REPEAT! UNGREASED! It can't climb if it's greased! Bake for 35 minutes before checking for doneness with a wooden skewer. (When inserted halfway between the inner and outer wall, the skewer should come out dry).
Cool upside down on cooling rack for at least an hour before removing from pan.
Related Posts Plugin for WordPress, Blogger...