Chocolate Dipped Creampuffs

Several years ago I decided to make cream puffs. It was so long ago, that I have to admit it was one of the first desserts I have ever made from scratch. The inspiration comes from a small family owned bakery in Santa Ana, CA. My family would go to this bakery often when I was a young girl. Cream puffs was one of their specialties. So I grew up eating cream puffs, and all my life I wanted to make them.

The only problem with all of this was that my parent's didn't let me cook or bake until I was 18 ish. By the time I reached that age, I went off to college near by and ate fast food and frozen meals when I was hungry for lunch on campus. And then for dinner, my mom would cook. Cooking was never sometime I did. I watched my mom cook though. I loved watching, because I wanted to learn.


I started dating my husband, then boyfriend, at age 21. He rented an apartment close to campus, and that's where I started cooking. That year, I graduated and we moved in together to a different apartment close to my engineering job, and that's when I started baking. He got me a KitchenAid mixer during Black friday that year, and all my baking adventures begun.

And cream puffs were one of the first desserts I made. Fast forward 5 years, and now I bake and do everything desserts. EVERYTHING. From fancy puff pastries and croissants to macarons and cake decorating. I'm always learning new tricks, but every time I make cream puffs, I remember the days where I had zero baking and decorating skills. =]


This weekend, my husband has to go to work on Sunday. He currently works at Yahoo, mostly programming to keep the Sports webpage up and running. And this weekend, there will be major traffic for Fantasy Sports. So I decided to make his co-workers some treats for their busy day!


Enough with the stories. Here is the recipe! Every time I make this, my friends and family can't get enough. And it's quite easy!!

Ingredients:

Pastry Cream:
2 cups of milk
1/2 cup + 2 Tbs sugar
5 egg yolks
1/4 cup cornstarch
2 tps vanilla extract
pinch of salt
1/2 cup heavy whipping cream

Dough:
1/2 cup butter
1 cup water
1/4 tps salt
1 cup all-purpose flour
4 eggs

Chocolate Glaze:
1/4 cup butter
2 Tbs milk
1/2 Tbs corn syrup
1 tps vanilla extract
2 oz chocolate chips, semi sweet
1 cup powdered sugar, sifted

Directions:

1. Preheat the oven to 425 degrees F.
2. Make the pastry cream first. Start with scalding the milk in a sauce pan, do not let it boil.
3. While the milk is heating up, whisk together the sugar, egg yolks, and cornstarch in a medium bowl. Set aside.
4. After the milk is scalding, slowly dribble it into the egg mixture while whisking constantly. Then return all the liquid back in the sauce pan.
5. Over medium-high heat, bring the mixture to a boil while whisking constantly. It should take a minute or two. The mixture should thicken up a lot.
6. Remove from heat, and add vanilla extract and salt. Adjust to taste. Let cool completely. We will mix in the whipped heavy cream after it cools.

7. To make the dough, boil the water and butter. Then stir in the flour and salt. The dough should come together.
8. Transfer the dough to your stand mixer bowl, and with the paddle attachment on low, add one egg at a time. Mix until all eggs are combined into the dough. It will be sticky.
9. Transfer the dough to a piping bag, and pipe blobs/rounds onto parchment paper lined baking sheets. Or you can spoon the mixture on to the baking sheet if you don't have a piping bag.
10. Bake for 20 to 25 minutes.
11. Poke a hole on the side of each cream puff after baking to release out the air to prevent the inside from being too soggy. Cool on baking rack.


12. After the pastry cream has cooled. Whip the heavy cream until soft peaks. Gently fold the cream into the egg mixture. Pipe the filling into each cream puff.

13. Now time to make the chocolate glaze. This step is optional. Cream puffs aren't traditionally glazed, but my husband likes them glazed. Start by combining the milk, butter, corn syrup and vanilla in a very small sauce pan over medium heat.
14. After the butter melts, add the chocolate. Whisk to combine evenly. After the chocolate melts, turn off the heat. Add the powdered sugar. Whisk to combine. Now you may begin dipping. If the chocolate thickens, return to the stove and heat for 1 minute.


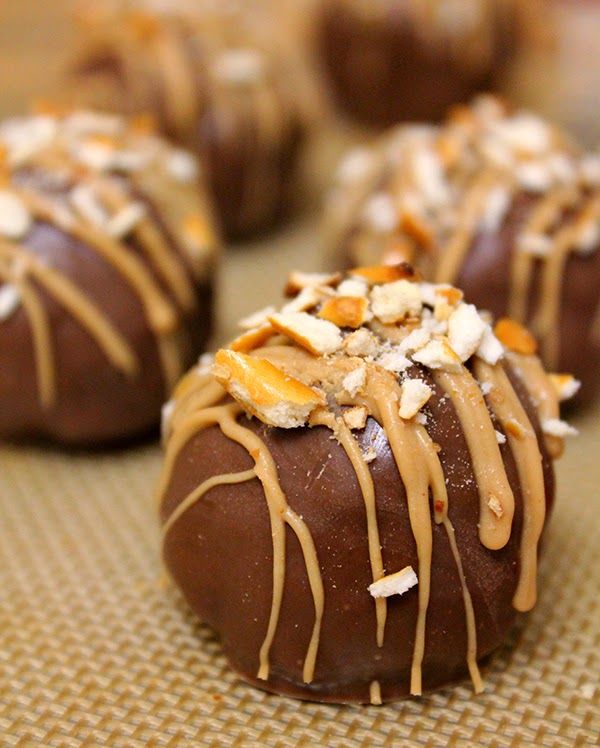
The above picture is the tray of chocolate dipped cream puffs I made for the co-workers. =]


Chocolate Cloud Meringue Cookies

I went on a month long vacation recently to New Jersey and New York. Which also put my house hunting to a pause. However, upon returning from vacation late last week, my husband and I went back to house shopping that weekend. I guess we did not get jet lag or tired from the flight. There's a point to this story. A delicious one. In one of the houses we saw, they had a platter of cookies. They appeared to be normal brownie cookies. Until you bite into one, it was like a meringue macaron type brownie cookie.


The outside was a hard, crunchy and crispy shell. The inside was like a brownie, but it melted in your mouth. Together, it was something similar to a macaron, but the outside was more like a meringue. Whatever it is, I fell in love. I set out on a mission to try to recreate this dessert.

After the first try. I made something similar, but not still on the dot. I decided to call them Chocolate Cloud Meringue Cookies. The shell is a delicate crispy. Much like a macaron. The inside is melt in your mouth brownie and chocolate heaven. I'm happy with the inside, but want a more harder and crunchy shell, so I will continue to alter this recipe until I get as close as possible to that open-house crunchy brownie cookie dessert. I hope I get the recipe correct soon!

But I do like this accidental dessert, so I will share the recipe with you! These are nothing like you had before!


Ingredients:
2 large egg whites
1/8 tps cream of tartar
1/2 tps vanilla extract
1/4 cup sugar
3/4 cup finely chopped walnuts
6 oz semisweet chocolate

Directions:
1. Preheat the oven to 350 degrees F.
2. Melt the chocolate in a double boiler or in the microwave at 50% power, stirring every 15 seconds.
3. Add the chopped walnuts in to the chocolate, allow to cool slightly.
4. Whip the egg whites on medium until frothy. Add the cream of tartar and vanilla extract. Continue mixing on medium and add the sugar gradually.
5. Turn the mixer on high, and whip until stiff peaks form.
6. Fold in 1/3 of the chocolate mixture into the egg whites, being very gentle. Continue to add more chocolate mixture until fully incorporated.
7. Scoop a tablespoon worth onto a baking tray lined with parchment paper or mat. I get about 12 scoops on my tray. Bake for 18 minutes. Or until dry on top.
8. Allow to cool before peeling off. Enjoy!

The recipe makes about 24 cookies.


I decided to call them chocolate cloud meringue cookies, because when you scoop them onto the baking tray, they look like a soft chocolate cloud. And then of course, the outside is meringue like and it looks like a cookie. I thought it would be too long to add the word 'brownie' in the name, but also because it doesn't define a brownie. Brownies have flour and butter, which this cookie does not!


Peanut Butter Pretzel Balls

It's been very hot this week... at least where I'm currently living. There are even more hot places, such as southern California. In fact, I use to live in San Marcos and Vista, CA where the current wild fires are destroying everything.

But we can't let this heat beat us! I wanted to make desserts this week, but it was too hot. I turned on the oven briefly, and my apartment felt so hot. So I wanted a no bake dessert. So then these peanut butter pretzel balls came into mind. They are also known as Chubby Hubby Truffles.

I made chocolate dipped strawberries at the beginning of the week. And those inspired me to make these. You will enjoy these. Peanut buttery, salty, and chocolatey. They are so easy to pop out, and it won't make your home any hotter!


You will only need a couple ingredients, you might already have them in your home!


Ingredients:
1 1/2 cups pretzel pieces
1/2 cup peanut butter (I used crunchy)
1 Tbs butter, unsalted and at room temp
2 Tbs brown sugar
pinch of salt
3 Tbs powdered sugar
1 cup of chocolate/candy melts (I used milk)

Directions:
1. Crush the pretzels to small pieces in a large bag, I used my rolling pin.
2. In a medium bowl, combine the butter, peanut butter, brown sugar, and salt. Mix with a spoon until smooth and well combined.
3. Add in the pretzel pieces. Mix until combined.
4. Sprinkle the powdered sugar on top. And then mix until well combined.
5. I used a small ice cream scoop, about 1 Tbs in size, to scoop out uniform balls. Shape each with your finger tips into round balls. I got 12 balls from the recipe.
6. Put the balls on a baking sheet and refrigerate for 30 minutes.
7. Melt the chocolate or candy melts in the microwave at 50% power. Stirring the chocolate/candy melts every 15 seconds. Add some vegetable oil, if needed, to thin the chocolate.
8. Using a fork, dip each ball into the chocolate to coat completely. Then transfer to a baking sheet lined with wax paper to set. Repeat with all the balls.
9. Melt some peanut butter flavors chocolate/candy melts and drizzle over the dipped balls. Sprinkle with more crushed pretzels.


10. Enjoy after chocolate sets, or store in airtight container in the refrigerator for later.


Rose Garden Tea Party

Tomorrow is my birthday, but I will be having my rose garden tea party this weekend. I've started on some of the desserts I will be making. I thought I would share them with you first, and update this blog post as more gets made.

So far, I made these cute cupcake toppers. They are tiny tea sets made out of fondant. I included a penny coin in the picture for size reference. I still have no idea what cupcake to make...maybe a coffee crumb cupcake? Seems tea like. =]

Here they are unpainted:

Then painted:

*Will update with more desserts and recipes this week*

Cinnamon Rolls with Cream Cheese Frosting

I've made cinnamon rolls numerous times, using several different recipes. I have never been truly satisfied with some of the previous recipes. They were good, but they were not amazing. However, the best recipe I have stumbled upon and tweaked is very similar to Cinnabon's cinnamon rolls. Even the cream cheese frosting. I hope you will enjoy making and eating them as much as I do. Your home will smell amazing as these bake.

This is a picture of them rising. They are ready to go into the oven.


Dough:
4 large egg yolks, room temperature
1 large whole egg, room temperature
1/4 cup sugar
6 tablespoon butter, melted
6 oz of buttermilk
2 tps sugar
16.25 oz all-purpose flour, about 4 cups
1 package of active dry yeast, about 2 1/4 tps
1 1/4 tps salt
vegetable oil

Filling:
8 oz light brown sugar
1 tablespoon ground cinnamon
pinch of salt
2 tablespoon butter, room temperature

Frosting:
8 oz cream cheese, room temperature
8 oz (2 sticks) butter, room temperature
1 lb powdered sugar
1 tps vanilla


Directions:
1. Heat the buttermilk until it reaches 105-110F. I used the microwave. Add the 2 tps of sugar and yeast. A quick stir to combine everything, and let proof for 10 minutes. Make sure the yeast is foamy and alive.
2. Add the egg yolks, whole egg, 1/4 cup sugar, melted butter, salt, and 10 oz of flour. Mix with a whisk until combined. Add the remaining 6.25 oz of flour. Using a stand mixer and dough hook, mix for 5 minutes on low speed.
3. After 5 minutes, touch the dough to see if it is sticky. It should be soft, but not sticky. If sticky, add a little more flour. Continue to knead for 5 more minutes in the mixer. The dough should pull away from the side of the bowl.
4. Put the dough in a large bowl that has been lightly oiled. Cover and let rise for 2 hours to 2 1/2 hours. The dough should double in size.

5. Combine the filling ingredients in a bowl, the brown sugar, salt, and cinnamon.
6. Butter a 9 x 13 inch baking dish. Turn the dough out onto a lightly floured surface.
7. Roll into a 18 x 12 rectangle. Smear the 2 tbs of butter on the dough evenly, leaving 1/2 border along the top.
8. Sprinkle the filling mixture over the dough evenly, again, leaving the 1/2 inch border.
9. Begin rolling the dough into a tight log, and pinch the seams to seal it at the end.
10. Cut into 12 equal pieces, and place cut side down into the baking dish. Cover, and let rise for 2 hours.
11. Preheat oven to 350F. Bake for 30 minutes.

12. While the rolls are cooling, make the frosting. Beat the cream cheese and butter until combined. Add all the powdered sugar, and mix on low medium for at least 12 minutes. Then add the vanilla extract, beat until combined.
13. Spread half the frosting onto the cinnamon rolls while warm, this will melt into all the crevices.
14. If enjoying immediately, put all the frosting on, or desired amount. If serving later, remove 1 roll onto a plate and add a dollop of frosting on top and microwave for 15 seconds to warm through. Enjoy!


Blog's 3rd Birthday

So tomorrow marks my blog's 3rd birthday. I can't believe it's been three years since I decided to start sharing my recipes, and tips. I thought I would have quit by now, but I really enjoy doing this. In fact, maybe in a couple months, there will be a whole new webpage for it.

I decided to make this simple and small, but very cute, cake for my blog. It is a 4 inch round.


The happy birthday garland hanging on it is made of paper and lollipop sticks. I believe it's called a flag bunt garland. I've included the template I used to make it. So you can give it a go too!


The roses are made out of fondant. The tutorial can be found HERE!

Some of my popular posts throughout the three years include:


I hope to share another year worth of recipes and tips with you!

Croissants and Pains Au Chocolat

I love croissants. I love all things pastries too. My husband brings me pastries on his way home from work sometimes. Sometimes I can't wait, and I want to make my own chocolate croissants aka pains au chocolat. Something flaky and buttery. Just yum.


I've never made croissants before, but I've made puff pastry before. The two doughs are very similar. The main difference is that croissant dough contains yeast, while puff pastry does not. So go ahead and make puff pastry instead. The difficulty is about the same for both. Today, I will give croissants a try!

Croissants are pretty easy to make. The ingredients are easy to find, and you probably already have them in your home. The only difficult part is the technique. Learning how to fold all those layers and keeping the dough and butter cold. Since I have made all sorts of pastries before, it has become second nature to me. I've included some pictures from my croissant adventure to help you along the way! =]

Just keep in mind, you probably won't finish in one day. It's a labor of love.


Ingredients:

Dough:
18 oz (4 cups) of all purpose flour
5 oz (1/2 cup + 2 Tbs) warm water
5 oz (1/2 cup + 2 Tbs) milk
2 oz (1/4 cup + 2 Tbs) sugar
3 Tbs butter, softened
1 Tbs + scant 1/2 tps active dry yeast
2 1/4 tps salt

Butter block:
10 oz (2 and 1/2 sticks) unsalted butter, cold

Egg wash:
1 large egg
1 tps water

Directions:
1. Warm water should be between 105 to 108 degrees F. Add sugar and yeast. Let foam for 10 minutes. Discard if the yeast does not foam, and try again.
2. Add the rest of the dough ingredients. Using dough hook, mix on low for 3 minutes. Dough should come together. Scrape sides of bowl if necessary.
3. Switch mixer speed to medium, and mix for 3 more minutes.
4. Transfer dough to plastic wrap. Cover and refrigerate overnight or for 6 to 8 hours.


5. The next day, cut your butter to form a 5 x 5 inch square. I cut the sticks in half, to form slabs. Arrange the butter pieces between two pieces of parchment paper. Begin to smash the butter gently with a rolling pin. After all the butter sticks together, you can gently roll on them. Shape into a 7 1/2 inch square. Cut and shape the butter to a perfect square, putting cut edge scrapes on top of block.


6. Refrigerate while you roll the dough.
7. Roll the dough into a 10 1/2 inch square. Place the butter in the center, so the corners of the butter point at the sides of the dough (see picture).


8. Wrap the butter up, by pulling the corners of the dough over the butter. (see picture). Seal all edges. You do not want the butter escaping. Try not to trap air bubbles.

9. Light flour your rolling surface. Focus on elongating, instead of widening your dough. Roll the dough until its 8 x 24 inches.

10. Fold the dough into thirds (see picture), this is also known as the business letter fold.

11. Cover in plastic wrap, and freeze for 20 minutes. Make space in that freezer. =]

12. Repeat the rolling and folding 2 more times, for a total of 3 times. Each time, roll in the direction of the open ends (see picture).


13. After the third rolling and folding, put the dough on a baking sheet. Cover with plastic wrap and refrigerate overnight or for at least 6 to 8 hours. The dough needs to rest.

14.The next day, lightly flour your surface. Cut the dough in half, and put one half back in the refrigerator, covered. Look at all those layers you've made!


15. Roll out your dough to a 8 x 22 rectangle. If the dough sticks, add some flour to your surface. Trim the dough so the shape is a perfect rectangle.
16. Cut out triangles using a pizza cutter. If you want them to be uniform, use a ruler and measure out triangles.
17. Stretch each triangle a little bit to elongate it to 10 inches. Cut a tiny 1/2 inch notch in the center of the short side of each triangle (see picture).


18. Lay the croissant/triangle on your work surface, with the notched side closest to you. With one hand on each side of the notch, begin to roll the dough away from you, towards the pointed end. Bend the legs to form that croissant shape. Shape the remaining triangles.

19. Repeat with the other half dough, or make chocolate croissants.

20. Put the croissants in a draft free spot at 75 to 80 F, loosely covered in plastic wrap. Let them proof/rise. It will take about 2 hours.


2 hours later they look like this. Slightly puffier, almost double in size.

21. Preheat your oven to 425 F.
22. Beat the egg wash ingredients together with a fork. Brush the croissants with the egg wash. Bake for about 15 to 20 minutes, rotating halfway during baking. If it gets too dark, lower the baking temperature to 410 F. Bake until golden brown.
23. Cool on racks, and enjoy slightly warm. Yum yum.

I even stuffed chocolate in the crescent shaped croissants. I love chocolate croissants that much. I couldn't bend them into that moon shape after stuffing them with chocolate, but that's ok!


This one is not stuffed with chocolate, so I was able to shape it into a moon:

This is how it looks on the inside. Just yum.

They re-heat very well too! Just preheat the oven to 350F. And bake for 10 minutes. They will taste just as fresh and flaky!


Variations:
Chocolate croissants can also be made instead.

Roll the dough (half) to an 8 x 22 inches rectangle. Cut the rolled dough into smaller rectangles, and add a little semi-sweet chocolate or any chocolate you like, and roll up.


Proof/rise and bake the same as the traditional croissants.


2 hours later. Almost doubled in size.

Fresh out the oven:

Drizzle them with some melted chocolate!


Enjoy your labor of love! My husband ate several for dessert and breakfast after they were made. They are so yummy. 


Related Posts Plugin for WordPress, Blogger...