Chocolate Cupcakes with Peanut Butter Buttercream

I have to admit, this is the best chocolate cupcake recipe I've ever eaten or made. It is beyond moist, and kind of dissolves on your tongue. I've been keeping this recipe a secret for over a year, and finally decided to share it today. Because my blog's birthday is tomorrow! It's been a good 2 years sharing my recipes and secrets with you! Do enjoy!


This recipe makes about 18 standard size cupcakes. I actually made mini cupcakes this time, and got about 60. So decide what your goal quantity is. This recipe is extremely easy to make. =]


The batter in this recipe is beyond runny. It's like soupy. That's the only thing I dislike about it. If you're not careful, it could make a mess on your cupcake pans. There's my warning.

Ingredients:

Dry:
1 3/4 cup flour, all purpose or cake
2 cup sugar
3/4 cup cocoa powder
2 tps baking soda
1 tps baking powder
1 tps salt

Wet:
2 eggs
1 cup strong coffee (1 cup hot water with 2 tps instant coffee)
1 cup buttermilk
1/2 cup vegetable oil
1 Tbs vanilla extract
1 Tbs coffee liquor, optional

Directions:
Preheat oven to 350F.
1. Combine all the dry ingredients. Sift it through a sleeve into a mixing bowl.
2. Add all the wet ingredients into the bowl.
3. Using a paddle attachment, mix for 2 minutes on medium.
3. For standard cupcakes, fill 2/3 full and bake for 15-18 minutes. For mini cupcakes, fill half full and bake for 10-12 minutes.
4. Let cool. Pipe chocolate ganache into the cupcakes (optional)
5. Swirl buttercream on top. Top with shredded Reeses peanut butter cups candy.

I swear you will never make another chocolate cupcake recipe after tasting this one.


Now for the buttercream. My favorite is a swiss meringue. It's not overly sweet, and melts in your mouth. Yummy! You can use your favorite swiss meringue buttercream, and add creamy peanut butter into it, to taste. I usually add 2 heaping spoon fulls.  I use this recipe for my buttercream, half it for this recipe.


Easter Basket Cookies

I know I said I would try to make a 3D Easter basket made of cookies. But I'm so busy this week. I opted to make flat baskets. They are still cute, and probably easier to eat. Maybe next year I will make the 3D baskets! =]


I made the roses/daisy flowers last month from all the extra royal icing I had leftover. I also made the mini rabbits/bunnies that are in the baskets last month too. I knew I was going to use them for Easter, I just wasn't sure how. I decided to stick them in these baskets. I have tons of flowers and bunnies royal icing transfers left over. I guess I could use them for a baby shower?


As usual, I try to come up with different designs for cookies. I dislike making the exact same cookie over and over, unless it's for a customer's order. So I came up with 4 different baskets, and filled them with 4 different designs.


 I hope these cookies inspire you to make cute baskets this Easter too!

Ingredients:
2 1/2 cups all purpose flour
1/2 cup cocoa powder
1 tps instant expresso/coffee powder
1/2 tps salt
1 cup (2 sticks) butter, softened
1 cup sugar
1 large egg, room temp.
1 tps vanilla extract

Directions:
1. In a medium bowl, combine flour, cocoa powder, coffee powder, and salt. Set aside.
2. In your mixer bowl, cream together the butter and sugar until light and fluffy.
3. Add in the egg and vanilla extract. Mix until well blended.
4. With the mixer on low, add in the flour mixture. Mix well.
5. Refrigerate until firm. 2 hours or overnight.
6. Preheat oven to 350F.
7. Roll cookies and cut. Bake for 12 minutes.
8. Cool before decorating.


For more Easter ideas, go here (Stamped Easter Cookies). Or here (Sheep Cookies).


Sheep Cookie Tutorial

I had a couple people comment and email me about the steps in making the sheep. It is very easy. And I will show you how!

First, have black and white royal icing ready. In bags or squeeze bottles with a #2 tip.


So have your cut, baked, and cooled cookie sheep shape. Any sheep shape will do!

Pipe the face and legs in black royal icing first. If you are in a rush, like me, you can pipe some bubbles too, just don't touch the black. The bubbles shouldn't be perfectly round. 


Let that dry overnight, or at least 16 hours. Black tends to bleed a lot. If you see any holes/craters in the dried icing, like the picture above, not to worry. We will fill those in now.


See, all the craters are covered up with the new set of bubble icing. Allow to dry for 1 hour.


Then pipe even more bubbles. Repeat. Being careful not to have two wet bubbles touch. Allow to dry for 1 hour.


Finally, after 4 or 5 bubble piping sessions, your sheep should be covered completely. Allow to dry for 1 hour again.


Then pipe on an eye. And a cute ribbon if you desire.


I hoped this tutorial has helped you.


The sheeps are baked on chocolate sugar cookies. The recipe can be found here.


Stamped Easter Chocolate Sugar Cookies

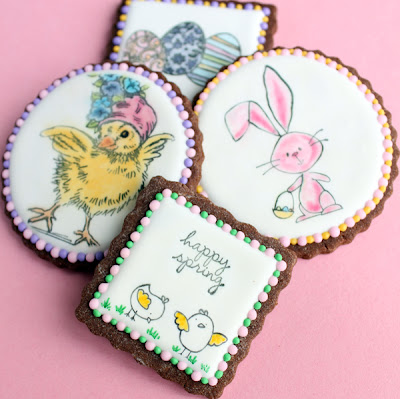
As promised, today I will sharing my stamped cookies. Stamping cookies is an easy and fast cookie decorating technique, but still delivers a "wow."

To stamp cookies, I just take a black food pen/marker, and color/fill in the rubber stamps with it. Then I gently press each stamp onto the dry royal icing base. I broke a couple cookies from too much pressure. =[ My husband ate all the mistakes.


I usually just stamp the cookies and add some royal icing accents on flowers, or dots where needed. Today, I wanted to try something new. I wanted to paint on the cookies.


I painted all 4 cookies. Well, paint seems misleading. I "painted" each cookie with petal/color dust. So technically, I dusted each cookie. I even made my own colors. I didn't own orange dust, so I mixed yellow and red dust together. I couldn't believe the orange came out so nice. Now I can buy less dust colors. Woot.


See this Easter bunny above? I tried being artistic and do shading. I'm not even sure if my shading is scientifically accurate. I'm not an artist. =/ But it looks pretty, so I went with it!


I hope you enjoy the cookies. They took a long time to "paint." Tomorrow, I will be posting more Easter cookies for you!


These cookies are chocolate sugar cookies. Here is the recipe to them. You can find more Easter cookies there too!


Easter Eggs Chocolate Sugar Cookies

This is my first time making chocolate sugar cookies. The taste is definitely yummy, I might never make plain vanilla sugar cookies ever again. The dark base color really makes the spring colors pop!

So today is the first day of cookie decorating for Easter. I plan to make cookies the next 3 days also, each day will be different designs and techniques. I did the same with the St. Patrick's day sugar cookies.

Today, I present hand piped Easter egg cookies. Tomorrow I will be working with rubber stamps on cookies. My goal is to make a 3D Easter egg basket sometime this week.


Anyways, I came up with 6 different Easter egg designs. You only see 5 in the photo though. Why? Because I originally came up with 5 designs. One of the design requires the wet on wet technique for royal icing. I was going to have one of the eggs have polka dots as a background. My brain must have been made of tofu, because I completely forgot about it when I was letting the icing dry.


So when I came back to it, the icings were dry. Darn. So I had to come up with a 6th design. You guys will never see the missing 5th design =[ Well, at least not this coming Easter.


This cookie in the middle here, is the 6th design.


So, this chocolate cookie is very yummy. You will love it more than my vanilla sugar cookie. It even has coffee in it, to make the chocolate extra chocolatey.

Ingredients:
2 1/2 cups all purpose flour
1/2 cup cocoa powder
1 tps instant expresso/coffee powder
1/2 tps salt
1 cup (2 sticks) butter, softened
1 cup sugar
1 large egg, room temp.
1 tps vanilla extract

Directions:
1. In a medium bowl, combine flour, cocoa powder, coffee powder, and salt. Set aside.
2. In your mixer bowl, cream together the butter and sugar until light and fluffy.
3. Add in the egg and vanilla extract. Mix until well blended.
4. With the mixer on low, add in the flour mixture. Mix well.
5. Refrigerate until firm. 2 hours or overnight.
6. Preheat oven to 350F.
7. Roll cookies and cut. Bake for 12 minutes.
8. Cool before decorating.

I made more cookies this week for Easter. 

Click the link to go see more.


Char Siu Bao (BBQ Pork Steam Buns)

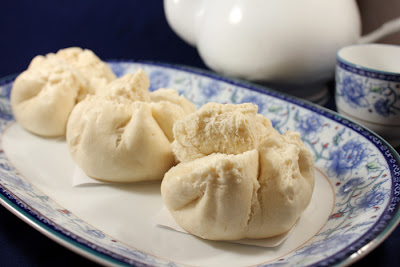
I've been trying to make char siu bao, aslo known as bbq pork steam buns, but never found the time for it. I've been planning to make it for a month now, I just had to find the right time to squeeze it in. Today wasn't actually a good day either. I was in my kitchen all day today, making royal icing, chocolate cookie dough, marshmallow fondant, and other random sweet desserts.

I toughed it out, marinated the pork, and made the steam bun dough. I'm glad I did.


This is my first time making char siu bao. The filling needs improvement, I will be tweaking it slowly until perfection is acheived. I like a dough without yeast. I feel like yeast steam buns have a weird yeast taste that never leaves even after steaming, so I'm against it. I've made steam buns with ground pork and eggs before.


I thought the filling was a little salty. I might add honey next time? My husband liked it, but he also didn't grow up eating steam buns. I aim for perfection every time I set out to copy something I've eaten in my childhood. Last week, I achieved the egg tarts, another dim sum item.

The recipe to the egg tarts is here -> EGG TARTS.


The next few weeks, I will try to get the filling right for the steam buns.


Here is the recipe for this steam bun.

Ingredients:
White Vinegar

Dough:
3 cups Self-Rising Flour
3 tps baking powder
1/2 cup sugar, more if you desire sweetness
1/4 tps salt
1 cup milk

Filling:
1/2 lb char siu, bbq pork (mine is homemade, directions below), cubed
1/2 Tbs oil
3 tps sugar
1 small onion, chopped
1 Tbs oyster sauce
1 Tbs soy sauce
1 tps sesame oil
2 drops of red food color, gel
fresh ground pepper
150 ml water
1 1/2 Tbs corn starch 

Directions:
1. Make/get char siu. Either go buy some at an asian BBQ shop or make some. I made mines. I marinated 1 pound of pork shoulder with a packet of bbq pork powder, available at asian markets. This was a shortcut, due to lack of time. Marinate for 4 hours.
2. Make the dough: Throw all the ingredients in a stand mixer, and mix for 15 minutes on low speed with either the dough or paddle attachment.
3. Cover and let rest for 45 minutes.
4. Make the filling: Heat up the oil in a wok/pan. Saute the onions until tender.
5. Add all the ingredients to the pan, except the water/corn starch.
6. Mix all the ingredients in the pan. Combine the water and corn starch in a small cup. Add to pan. Simmer until thickened.
7. Let cool. Divide into 21 portions. I used a small cookie scoop for perfect measurement.
8. Roll the dough on a lightly flour surface. Divide dough into 21 parts.
9. Set-up steamer. After the water boils, add some white vinegar in the water for whiter buns.
10. Roll each dough piece into a circle. The center being slightly thicker.
11. Add 1 tablespoon of filling. Pleat and seal the bun. Repeat.
12. Steam 5-6 pieces for 12 minutes. Don't open the steamer in the middle of cooking.
13. Remove from buns from streamer to prevent soggy bottoms. Repeat steaming with rest of buns.
14. Enjoy.


Egg Tart (Dan Tat)

My search for the perfect egg custard tart, or dan tat, has come to an end. I've been testing recipes for over a year. I've been playing with different recipes, and tweaking ones I thought were good. I have now come to a conclusion.

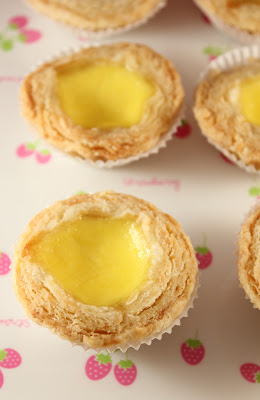
This recipe for egg tarts is exactly like the ones at a good dim sum place. It's flaky like puff pastry but still buttery and crumbly like shortcrust pastries. It's what a good egg tart should be.


I tried 3 different recipes in the same day. Not caring about the way they looked by the third recipe, I stuffed them into the egg tart tin/mold and baked away. Unknowingly, that last recipe was everything I ever wanted in a recipe.

So these egg tarts aren't as pretty as they can be, but they taste so delicious. I will have to make these again, paying extra attention to making them pretty next time for you.


You can see all those layers that make it so flaky and crumbly. They hold their shape when you bite into them. It's perfect.


Most of the recipe is by weight, instead of volume measurements. I recommend you go invest in a food scale. It's a very handy kitchen tool. I use mines many times a week. Without further a due, here is the recipe:

Water Dough:
250 g all-purpose flour
1/2 egg, beaten
25 g sugar
13 g shortening
75 g cold water

Oil Dough:
150 g cold butter
250 g shortening
200 g all-purpose flour

Egg Filling:
80 g sugar
280 ml cold water
4 large eggs
80 ml half and half

1. Make oil dough first. Put flour in a large mixing bowl. Add in butter, and cut using a pastry cutter. Then add shortening. Use a pastry cutter to combine into a dough.
2. Place in plastic wrap and freeze until firm. Mine takes about an hour.
3. For water dough: Put flour in a large bowl. Add in egg, sugar, and shortening. Mix. Add in cold water. Mix until a dough forms. Do not over mix.
4. Place in plastic wrap and freeze until firm.
5. After doughs are firm. Preheat oven to 350F. Make egg filling.
6. For egg filling: Boil water with sugar, until sugar dissolves. Let cool.
7. Mix eggs with half & half using a fork. Try not to add bubbles.
8. After sugar cools, add to egg mixture. Sieve mixture twice. Cover and keep in fridge until ready.
9. Roll out the oil dough into a rectangle.
10. Roll out the water dough into a rectangle that is twice as long as the oil.
11. Put the oil dough in the center of the water dough. Fold up both ends of the water dough to meet in the center, covering the oil dough completely.
12. Roll out flat. Fold into quarters. Freeze 20 minutes. Repeat twice.
13. Roll out flat and thin, then cut dough using a round cookie cutter a little bigger than the tart tin's diameter.
14. Place each circle into the tart tin (mines were 2 inches in diameter on top), and press into mold. Repeat with all of dough and mold.
15. Place molds on a baking sheet. Pour egg mixture into prepared mold until 4/5 full.
16. Bake for 25 minutes or until golden. Do not let the centers bubble up or form spheres. Your oven is too hot if it does.


You will love these, I promise.


St. Patrick's Day Sugar Cookies

I didn't plan on making cookies for St. Patrick's Day. I wanted to concentrate more on Easter designs. However, my husband said that I could make a chocolate mint cookie if I did St. Patty's cookies. I never even heard of chocolate mint sugar cookies. The idea was definitely stuck in my mind.

I decided to invent a recipe. Some basic sugar cookie dough - enhanced. I will be sharing this yummy cookie recipe with you. It's delicious enough to be eaten fresh out of the oven. A chocolate mint rolled/cut-out sugar cookie.

After baking these cookies, I did decorating on 3 different days. Each day I did a different set of designs. The last day, I finished way toooooo late in the night. The picture isn't as pretty without the natural light of the sun, oh well. =[ I packaged the cookies immediately and shipped them to my in-laws, so I didn't get a change to take a pretty picture the next day.


On the first day, I tried to come up with 6 different designs for the popular shamrock cookie cutter shape. I made a very basic one, covered a cookie in green royal icing with a green outline. I dazzled one with white sanding sugar on the outline. It was an easy way out.


Then I tried to be more creative, the other 4 designs were good enough for me.


On the second day, I wanted to play with other shapes. My favorite one on the second day is the pot of gold. I filtered out yellow confetti sprinkles from a spring confetti sprinkle jar by wilton for the gold coins. I painted them in gold luster dust for more gold like qualities.


For the pot of gold cookie, you start with an empty undecorated cookie.
Outline a pot shape and fill in.


After the base dries, draw a lip/rim on top of the pot. Allow to set.


Fill in the top with yellow/gold color royal icing. Sprinkle with yellow confetti sprinkles. Allow to set.


Then paint gold luster dust on coins if desired.


I also painted gold luster dust on this tiny pot:


I disliked making the rainbow cookie. I often dislike making cookies that require more than 4 colors. So much color mixing, and so much piping bags to fill. =[


On the third day. I went crazy with ideas. I tried drawing a cute leprechaun and his hat and a cool shamrock holding a flag. I had fun with these designs. 


I took tons of more pictures of each cookie at a close up angle, but don't have enough time to process the images tonight. Will update this post tomorrow with more photos, possibly maybe 2 days - some time before March 17. I promise.

Here is the chocolate mint sugar cookie recipe:

Chocolate Mint Cut-Out Cookies

Ingredients:
1 cup unsalted butter, softened
1 cup granulated sugar
1 large egg
1/2 tsp peppermint extract
Green food coloring (2 drops if gel)
2 1/2 cups of all purpose flour
1/4 tps salt
1/3 cup Andes chocolate mints, roughly chopped

Directions:
1. In a large mixing bowl, cream butter and sugar until smooth and fluffy.
2. Add egg, extract, and food coloring to achieve green color. Mix well.
3. In a separate bowl, combine flour, (cocoa powder)and salt.
4. Add flour mixture to creamed butter bowl. Mix well.
5. Mix in Andes mint. Either fold in, or mix in.
6. Refrigerate dough for at least an hour or overnight until firm.
7. Preheat oven to 350 F. Roll out dough to 1/8 in thick and cut shapes.
8. Bake for 8-10 minutes. Cool on a wire rack before decorating.

Makes 2 to 3 dozen cookies depending on cutter size. I got 2 1/2 dozen.


Related Posts Plugin for WordPress, Blogger...