Marshmallow Fondant

I've been wanting to make marshmallow fondant for a while now. I'm baking a birthday cake and want to put roses on the cake, but I can't pipe pretty roses. =[

I can mold roses much more pretty than I can pipe them. So I decided to make marshmallow fondant! Here's my first rose:

I'm hoping I can make prettier roses after more attempts!

Here is the recipe I used for marshmallow fondant:

Ingredients


21 ounces mini white marshmallows (2-10.5 ounce bags)
1/2 cup butter
2 pounds confectioners’ sugar, plus more for dusting
1-3 tablespoons water

Directions
Place the butter and marshmallows in a large microwave safe bowl. Place the bowl in the microwave and cook for 30 seconds. Remove and stir thoroughly. Repeat these two steps until the everything is completely melted and well mixed. 

Leave the marshmallow mixture in it’s bowl and pour half of the sugar on top. Mix the powdered sugar into the mixture.

Generously dust the countertop with confectioners’ sugar. Pour the fondant mixture in the middle. Coat your hands in confectioners’ sugar and sprinkle more on top of the mixture. Using your hands, this is going to be very sticky, begin kneading the mixture and sugar together, generously adding the other half of the sugar to the mixture, as needed.

Continue kneading the dough until it is smooth and firm, adding more sugar to the countertop and hands, as needed. If the dough becomes to dry and tears easily, add a little water to soften it, being very careful not to add too much.

Lightly dust the fondant with confectioners’ sugar and place it in a large zippered bag, squeezing out as much air as possible before sealing. Let it rest at room temperature at least overnight before using. You can use it right away on small projects, like covering cupcakes, but it will be too soft to do anything larger or to sculpt with.

This recipe holds well in the refrigerator for weeks, so it is helpful to make it ahead when you know you have an event or project coming up. If you make it ahead, just remove it from the refrigerator, allow it to rest, sealed and at room temperature, for at least 24 hours before using it.

To use your fondant, dust the countertop with confectioners’ sugar. Place the fondant in the microwave for 10 seconds (no more) to soften it. Place on the counter and knead for a couple of minutes to soften further. Now you’re ready to add color, roll it out, or start sculpting!

Here are the roses I make now-a-days after practice! =]


Bacon Pralines

My boyfriend never tried candied bacon before, but he loves loves LOVES bacon. I actually don't care about bacon. He saw bacon pralines being advertised on television one day, and suggested I should make it. He wanted to try candied bacon from me first!

Believe me, I would never make this if I didn't have a boyfriend obsessed with bacon. The idea of sweets and bacon don't mix too well for me, although I heard people say bacon tastes better with everything - including ice cream. Bacon ice cream...eww. Haha, I never tried it...it actually may be good. If you have tried it, let me know if it is delicious!

The bacon pralines tasted pretty good, if you didn't tell me bacon was in it, I don't think I would have known. Without farther delay, the bacon praline recipe is below:

Ingredients

  • 1 pound thick-cut bacon
  • 3 tablespoons plus 2 cups light brown sugar
  • 3 tablespoons plus 2 tablespoons butter, cut into 1/2-inch cubes
  • 1 1/4 cups pecans, roughly chopped
  • 1/2 cup heavy cream
  • 1/4 teaspoon table salt

Directions

You will need a candy thermometer for this recipe!
Preheat the oven to 400 degrees F. Line 1 rimmed sheet pan with heavy foil and another with parchment paper.
Place a baking rack over the foil-lined sheet pan and arrange the bacon slices across the rack next to each other, but not overlapping. Bake until crispy, 15 to 18 minutes. When cool enough to handle, finely chop and set aside.
Reduce the oven temp to 350 degrees F.
In a small saucepan over moderate heat, melt 3 tablespoons butter and 3 tablespoons brown sugar, about 1 minute. Add the pecans and combine until the pecans are coated. Pour out onto another unlined sheet pan and bake until golden brown, about 10 minutes. Let cool.
Place the remaining 2 cups brown sugar into a 3-quart heavy saucepan, being careful to not get sugar on the sides of the pan. Add the cream, the remaining 2 tablespoons butter and salt and cook over very low heat (do not let simmer), stirring frequently with a rubber spatula, until the sugar is dissolved, 10 to 15 minutes. Wash down any sugar crystals on the side of the pan with a pastry brush dipped in cold water. Clamp on a candy thermometer to the saucepan and boil the syrup over moderately-high heat until it registers 236 degrees F.
Remove the pan from the heat, leaving the thermometer in place, and let cool until the syrup registers 220 degrees F, 1 to 2 minutes. Using a rubber spatula, stir in the bacon and pecans. Working quickly, drop 1 tablespoon of pralines onto the prepared parchment-lined sheet pan. If the mixture starts to harden, place back on the stove over moderately-low heat and let it melt. Let the pralines sit until they harden, about 45 minutes.


Cream Cheese Danish

I had some extra puff pastry sheets in the freezer waiting to be used. I also had a package of cream cheese without a purpose. So it hits me, why not make an easy cream cheese danish? Instead of pondering what else I could make, I started making the cream cheese danish immediately!

The results were super delicious! This easy cream cheese danish will be your go to dessert when you're in a rush to make something fancy.

Ingredients
  • 8 ounces cream cheese, at room temperature
  • 1/3 cup sugar
  • 2 extra-large egg yolks, at room temperature
  • 2 tablespoons sour cream
  • 1 teaspoon pure vanilla extract
  • 1/4 teaspoon kosher salt
  • 1 tablespoon grated lemon zest (2 lemons)
  • 2 sheets (1 box) frozen puff pastry, defrosted
  • 1 egg beaten with 1 tablespoon water, for egg wash
Directions
Preheat the oven to 400 degrees F. Line a sheet pan with parchment paper.
Place the cream cheese and sugar in the bowl of an electric mixer fitted with a paddle attachment and cream them together on low speed until smooth. With the mixer still on low, add the egg yolks, sour cream, vanilla, salt, and lemon zest and mix until just combined.
Unfold 1 sheet of puff pastry onto a lightly floured board and roll it slightly with a floured rolling pin until it's a 10 by 10-inch square. Cut the sheet into quarters with a sharp knife. Place a heaping tablespoon of cheese filling into the middle of each of the 4 squares. Brush the border of each pastry with egg wash and fold 2 opposite corners to the center, brushing and overlapping the corners of each pastry so they firmly stick together.
Brush the top of the pastries with egg wash. Place the pastries on the prepared sheet pan. Repeat with the second sheet of puff pastry and refrigerate the filled Danish for 15 minutes.
Bake the pastries for about 20 minutes until puffed and brown. Serve warm.


Miso Soup

Miso soup is my boyfriend's favorite asian style soup. For some reason, he does not like egg drop soup or hot and sour soup. His favorite soup of all times is Italian Wedding Soup, which I plan to make for him some time this month. I've actually promised to make him some a while back, but never got around to it.

Miso soup is actually quite simple to make. It uses dashi, miso paste, silken tofu, water, and green onions. Five ingredients, super simple! Finding the dashi was an adventure for me though. I went to tons of stores trying to find dashi, but nobody had it. In the end, I found dashi at the 99 Ranch Market.

I used a miso paste that was half red and half white paste combined. It turned out really good.


Ingredients
12-ounce block firm silken tofu
2 quarts dashi
6 tablespoons dark or red miso
2 tablespoons light or white miso
4 green onions, thinly sliced

Directions
Wrap the block of tofu in 2 layers of paper towels and lay on a plate. Invert a second plate on top of the tofu and weigh down with a 28-ounce can. Leave for 20 minutes then cut the tofu into 1/4 to 1/2-inch cubes.

Heat the dashi in a 4-quart saucepan over medium-high heat. When the dashi reaches 100 degrees F on an instant-read thermometer, ladle 1 cup into a small bowl. Add the miso, and whisk until smooth.

Bring the remaining dashi to a bare simmer (about 185 F), approximately 10 minutes. Add the miso mixture and whisk to combine. Return to a slight simmer, being careful not to boil the mixture. Add the tofu and scallions and cook for another minute or until heated through. Remove from the heat, ladle into soup bowls and serve immediately.


Cream Puffs and Profiteroles

My boyfriend requested me to make eclairs again. The eclair recipe can be found here. Since the dough to make eclairs and cream puffs are practically the same, I decided to make some cream puffs too. Cream puffs are also known as profiteroles.

There are some tricks to keeping the cream puff from collapsing through. I poke a small hole with a toothpick in each cream puff after baking them to allow some steam to escape. You could also leave the oven door ajar or opened slightly after baking to let them cool off in the oven. Either trick works, and it depends on your preference.

Ingredients:

  • 2 (3.5 ounce) packages instant vanilla pudding mix
  • 2 cups heavy cream
  • 1 cup milk
  •  
  • 1/2 cup butter
  • 1 cup water
  • 1/4 teaspoon salt
  • 1 cup all-purpose flour
  • 4 eggs

  • Directions:
  • In a stand mixer with whisk attachment, whisk together vanilla instant pudding mix, cream and milk until stiff peaks form. Cover and refrigerate to set.

  • Preheat oven to 425 degrees F (220 degrees C).

  • In a large pot, bring water and butter to a boil, making sure all of the butter is melted. Stir in flour and salt until the mixture forms a ball. Transfer the dough to a large mixing bowl. Using a wooden spoon or stand mixer, beat in the eggs one at a time, mixing well after each. Pipe cream puffs or drop by tablespoonfuls onto an ungreased baking sheet lined with parchment paper.

  • Bake for 20 to 25 minutes in the preheated oven, until golden brown. Centers should be dry. Poke a small hole on the side of each cream puff with a toothpick.

  • When the shells are cool, either split and fill them with the pudding mixture, or use a pastry bag to pipe the pudding into the shells.


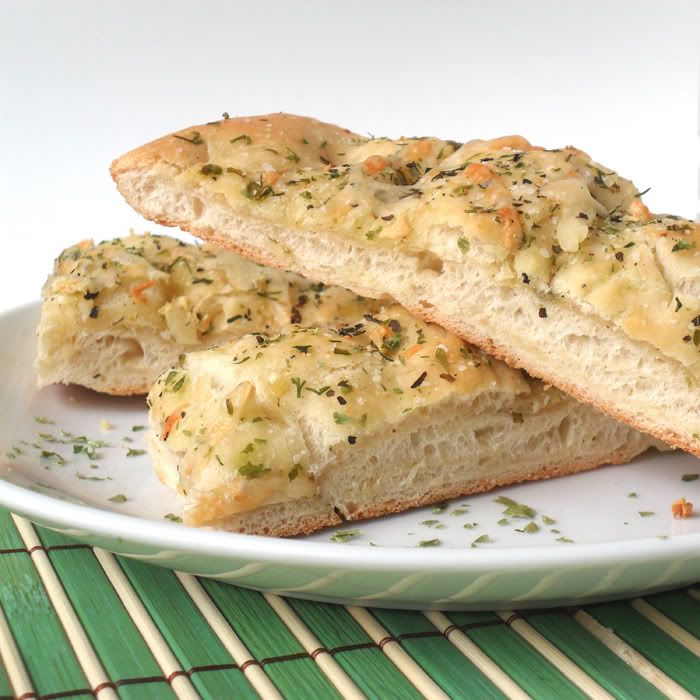
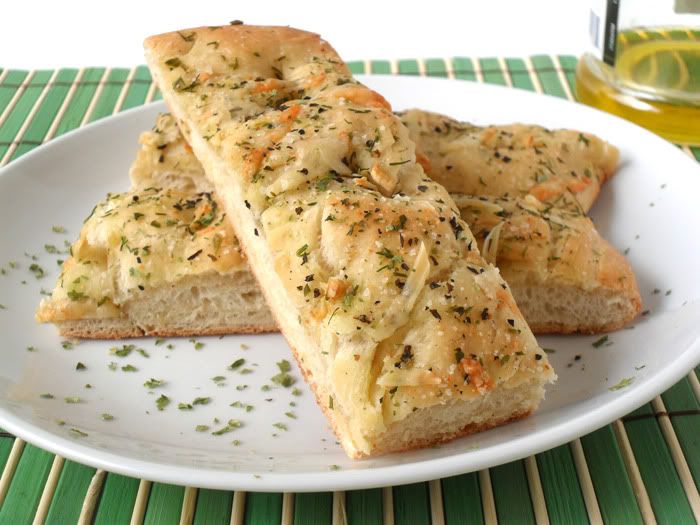
Parsley and Pepper Focaccia

I've been meaning to make a focaccia bread for a while now. I see beautiful photos of it on food sites like tastespotting and foodgawker, and I've been waiting for an opportunity to make it! I've looked through tons of recipes, and have modified a few to build the perfect recipe for me! They came out so delicious! Crunchy but still chewy!

Ingredients:
  • 2 teaspoons rapid-rising dry yeast
  • 1 cup warm water
  • 2 tablespoons sugar
  • 3 1/2 to 4 cups bread flour
  • 1 tablespoon coarse salt
  • 1/4 cup olive oil
  • Cornmeal, for dusting
Toppings:
  • 2 tablespoons olive oil
  • 1 onion, diced
  • 2 garlic cloves, minced
  • 1/4 cup shredded Parmesan
  • 1 tablespoon coarse salt
  • Freshly ground black pepper
  • 2 tablespoons fresh parsley
  • 1 tablespoon fresh rosemary
Directions:
In the bowl of a standing mixer fitted with a dough hook, proof the yeast by combining it with the warm water and sugar. Stir gently to dissolve. Let stand 3 minutes until foam appears. Turn mixer on low and slowly add the flour to the bowl. Dissolve salt in 2 tablespoons of water and add it to the mixture. Pour in 1/4 cup olive oil. When the dough starts to come together, increase the speed to medium. Stop the machine periodically to scrape the dough off the hook. Mix until the dough is smooth and elastic, about 10 minutes, adding flour as necessary.
Turn the dough out onto a work surface and fold over itself a few times. Form the dough into a round and place in an oiled bowl, turn to coat the entire ball with oil so it doesn't form a skin. Cover with plastic wrap or damp towel and let rise over a gas pilot light on the stovetop or other warm place until doubled in size, about 45 minutes.
Coat a sheet pan with a little olive oil and corn meal. Once the dough is doubled and domed, turn it out onto the counter. Roll and stretch the dough out to an oblong shape about 1/2-inch thick. Lay the flattened dough on the pan and cover with plastic wrap. Let rest for 15 minutes.
In the meantime, coat a small saute pan with olive oil, add the onion, and cook over low heat for 15 minutes until the onions caramelize. Preheat oven to 400 degrees F. Uncover the dough and dimple with your fingertips. Brush the surface with more olive oil and then add caramelized onions, garlic, cheese, salt, pepper, parsley, and rosemary. Bake on the bottom rack for 15 to 20 minutes.

Chocolate Molten Lava Cake


I was watching Food Network this weekend when I saw a recipe for chocolate molten lava cake. It inspired me to try to make this sweet and gooey chocolate dessert. I must admit, the results were absolutely delicious!!! My boyfriend and I ate them all, and I ended up making a second batch! It's worth a try!

When you break into it, chocolate lava starts flowing out. Absolutely delicious!

This is what it looks like before you pop it open with your fork!

A surprise is waiting inside:

Ingredients
1/2 pound (2 sticks) unsalted butter, plus more for greasing
1/2 pound bittersweet chocolate, at least 60 percent
1/2 cup granulated sugar
3 large eggs
3 tablespoons cake flour

    Directions
    Preheat the oven to 350 degrees F. Butter 4 (6-ounce) ramekins and set aside.
    Over a double boiler, melt the butter and chocolate, whisking until smooth. Make sure to whisk until the chocolate and butter have combined into a smooth chocolate mixture. Whisk in the sugar, making sure most of the sugar dissolves in the warm chocolate mixture.
    In a medium bowl, whisk the eggs until smooth. Pour the chocolate mixture in to the eggs. Whisk until smooth, then add the flour and combine until smooth. Pour the batter into the prepared ramekins about 2/3 full. Bake the cakes until slightly puffy and set around the edges, 20 to 25 minutes. Don't worry if your cake tester comes out wet, the center should still be loose. Serve warm.


    Creme Brulee

    I just got a creme brulee torch (Kitchen Torch). Obviously, I need a reason to use it. The first thing that hits my mind is, "why not make creme brulee?" So I did. Here are the results - delicious!

    Ingredients

    • 2 cups heavy cream
    • 1/4 cup white sugar
    • 1 pinch salt
    • 1 teaspoon vanilla extract
    • 3 egg yolks
    • 4 tablespoons white sugar


    Directions

    1. Preheat oven to 300 degrees F (150 degrees C) and line the bottom of a large baking pan with a damp kitchen cloth.
    2. Bring a large pot of water to boil.
    3. In the meantime, combine cream, 1/4 cup sugar and salt in saucepan over medium heat. Stir occasionally 4 to 5 minutes, until steam rises.
    4. In a medium bowl, beat egg yolks and vanilla until smooth. Pour hot cream into yolks, a little at a time, stirring constantly, until all cream is incorporated. Pour mixture into four 6 oz. ramekins.
    5. Place ramekins on towel in baking dish, and place dish on oven rack. Pour the boiling water into dish to halfway up the sides of the ramekins. Cover whole pan loosely with foil.
    6. Bake 25 to 30 minutes in the preheated oven, until custard is just set. Chill ramekins in refrigerator 4 to 6 hours.
    7. Before serving, sprinkle 1 tablespoon sugar over each custard. Use a kitchen torch or oven broiler to brown top, 2 to 3 minutes.


    Crumb Cake Cupcakes

    My boyfriend loves coffee cake. However, the term "coffee cake" did not return results that I hoped for. I believe crumb cake is the correct term. If there is a difference between coffee cake and crumb cake, I don't know what it is. If you know it, please tell me!

    I decided to make a traditional crumb cake into crumb cupcakes for the ease of not having to cut the cake into perfect squares. I'm a lil OCD about cutting the perfect square. So to prevent myself from going crazy trying to cut perfect 3 x 3 in squares, cupcake form is the perfect solution!


    French Onion Soup

    Soup of the day: French Onion Soup. This soup was approved by my boyfriend, which makes me feel like a chef! =] It was a very simple soup to make, although I found the Gruyere cheese a little pricey. It was $22/lb. I got half a pound, which was enough for several ramekins servings!

    So without further delay, the recipe:

    Ingredients

    • 1/2 cup unsalted butter
    • 4 onions, sliced
    • 2 garlic cloves, chopped
    • 2 bay leaves
    • 2 fresh thyme sprigs
    • Kosher salt and freshly ground black pepper
    • 1 cup red wine, about 1/2 bottle
    • 3 heaping tablespoons all-purpose flour
    • 2 quarts beef broth
    • 1 baguette, sliced
    • 1/2 pound grated Gruyere

    Directions

    Melt the stick of butter in a large pot over medium heat. Add the onions, garlic, bay leaves, thyme, and salt and pepper and cook until the onions are very soft and caramelized, about 25 minutes. Add the wine, bring to a boil, reduce the heat and simmer until the wine has evaporated and the onions are dry, about 5 minutes. Discard the bay leaves and thyme sprigs. Dust the onions with the flour and give them a stir. Turn the heat down to medium low so the flour doesn't burn, and cook for 10 minutes to cook out the raw flour taste. Now add the beef broth, bring the soup back to a simmer, and cook for 10 minutes. Season, to taste, with salt and pepper.
    When you're ready to eat, preheat the broiler. Arrange the baguette slices on a baking sheet in a single layer. Sprinkle the slices with the Gruyere and broil until bubbly and golden brown, 3 to 5 minutes.
    Ladle the soup in bowls and float several of the Gruyere croutons on top.
    Alternative method: Ladle the soup into bowls, top each with 2 slices of bread and top with cheese. Put the bowls into the oven to toast the bread and melt the cheese.


    Related Posts Plugin for WordPress, Blogger...