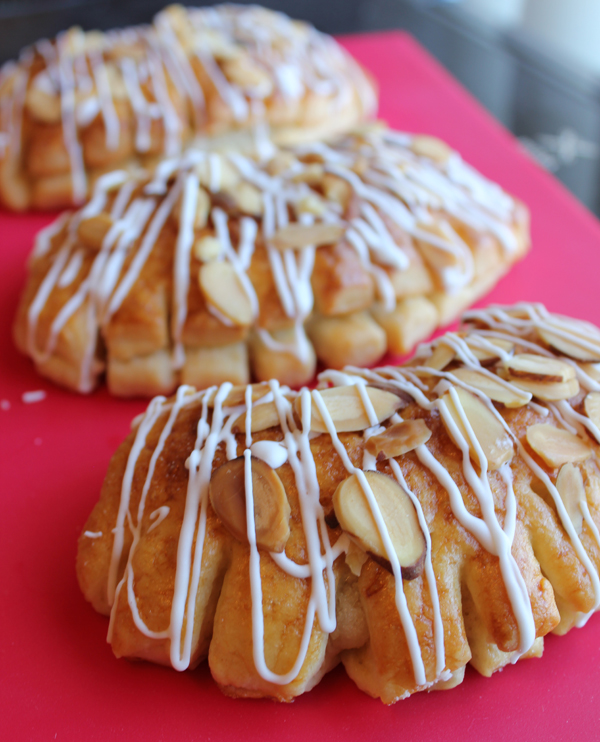
Almond Bear Claws

I made these bear claws before. It's a little different from the first ones I've made. These ones are just as yummy though.


The main difference is that I sprinkle sugar and almonds on these claws before baking. I also use royal icing instead, because I want the icing to be more crunchy!

Ingredients:
3 sticks of cold butter, cubed
5 cups of all-purpose flour
1 package of active dry yeast
1 1/4 cups of half and half
1/4 cup sugar
1/4 tps salt
2 eggs
3/4 cup powdered sugar
1/2 cup almond paste, cubed
1 Tbs water
Sugar
Sliced almonds
Royal icing

Directions:
1. In a large bowl cut the butter into the 5 cups of flour until pea sized crumbs are made. Refrigerate.
2. Heat half and half, sugar, and salt in a sauce pan until 110-115 F. Pour over yeast and mix. Let foam for 5 minutes. Add 1 egg. Mix. (I didn't have half and half. I mixed half heavy cream with half almond milk to make my half and half.)
3. Stir in flour/butter until smooth.
4. On a floured surface, roll into a 21 x 12 in rectangle. Fold into thirds starting at short side forming a 12 x 7 in rectangle.
5. Do a quarter turn, roll into 21 x 12 inch again, fold into thirds.
6. Repeat steps 4 and 5.
7. Cover and chill dough for at least 4 hours.
8. In a small bowl, beat only the egg white until foamy. Add almond paste and powdered sugar. Combine until smooth.
9. Cut dough in half. Roll each portion into a 12 inch square.
10. Cut each portion into 9 equal pieces, 18 total. Fill each with a little almond paste mixture.
11. Fold in half, seal edges. Cut into the sealed edge to make bear "claws."
12. Cover, let rise for an hour.

Cut strips to make claws:

After an hour of rising:

13. Beat 1 Tbs water with remaining egg yolk. Brush over each bear claw.
14. Sprinkle with almonds, then sugar.
15. Bake at 375 F for 15 minutes, or until golden brown.
16. Remove to wire rack, cool. Drizzle with royal icing. Add more almonds if desired.
17. Enjoy with coffee or tea =]


Penguins on a Cookie - Christmas Cookie Tutorial

Another one of the designs I went for this Christmas. I love penguins. I think they are cute, and so adorable. They fit in with the winter theme so nicely, and they look cute on cookies.


They were a great hit among my friends, for how cute they are. You can make the same ones too by following my picture tutorial!

Lets get started.


1. Using royal icing, pipe an outline around a round cookie, and flood it immediately with white icing. Let that dry for 24 hours.

2. Pipe the shape of the penguin on the cookie. Let that dry for 24 hours, do not skip the drying part, otherwise the black will bleed into the white icing. Don't fill in the belly yet.


3. After drying for 24 hours or more, fill in the belly of the penguin. Let that dry for 16 hours.

4. Pipe a blue scarf across the penguin's body. Pipe the part of the hat. Let dry for 15 minutes.


5. Pipe the first dangling part of the scarf. Use a toothpick to drag out fringes for the scarf. Pipe the feet. Let dry 6 hours.


6. Pipe the second part of the dangling scarf. Eyes, mouth, and rest of the hat.


7. You're done. Let dry overnight before packaging.


Gingerbread Christmas Cookies

I know I just posted the holly leaves cookies. I just had to post some more Christmas themed cookies. This one is an attempt at copying an image from a ribbon onto a cookie.


I got the ribbon at a Michaels craft store. This is my first attempt at copying an image onto a cookie.


What do you think? Did I do a good job?


I'm sorry I don't have a picture tutorial for this cookie design. It actually slipped my mind.


The gingerbread recipe can be found here:

Holly Leaf Cookies

I wanted to practice my piping skills again. I want to perfect it. I even dream about what designs I can make and new techniques. It has become quite the addiction.

I made these holly leaves cookies. They are the easiest ones to make out of the entire Christmas series I am making. Which I plan to post picture tutorials about soon. I think these holly leaves are easy enough to make without a picture tutorial, so I got them up and posted first.


Here is a SMALL preview of what I am working on:

In fact, from the above picture, you can tell the holly leaves are separate cookies, but together, they form that image you think of a holly leaf.


I used a #2 piping tip to outline and flood the cookie. After drying for 1 hour, I outlined the cookie with a #1 piping tip. After another hour, I pipe a mountain of green icing at the tip of the holly leaf, and stuck a red m&m on the leaf.

The cookies here at gingerbread. Here is the recipe I used:

Ingredients:
800 grams of all purpose flour
250 grams of softened butter, unsalted
1 cup of dark brown sugar, packed
3 tps ground cinnamon
3 tps ground ginger
1 tps ground cloves
1 tps salt
2 large eggs
1 cup molasses

Directions:
1. Cream the butter and sugar in a mixer bowl until creamy.
2. Mix in spices. Combine. Then add eggs, one at a time. Then add molasses.
3. Mix flour and salt together. Add to bowl. Mix until just combined
4. Refrigerate overnight, or at least 1 hour.
5. Preheat oven to 350F.
6. Cut out shapes. Use rolling bands for same width.
7. Bake for 12 to 14 minutes.


Heath Peanut Butter Cookies

My husband's favorite topping on ice cream is a mixture of chocolate brownie and the heath candy bar. I was grocery shopping one day, when I spotted a bag of heath bar bits. Basically, a heath bar...already smashed into tiny bits. I bought it without a second thought. My husband is sure to like anything I make with these.

Then...a couple days later. The heath peanut butter cookie came into our lives. My husband loves it!


The toffee bits in the cookie give the cookie a yummy sweet crunch. It's a soft cookie, something he also loves.

The only annoying thing about the cookies, is topping it with heath bits before baking it. I find that the bits melted between my fingers. A messy job, but totally worth it.

Ingredients:
1/2 cup shortening
3/4 cup of your favorite peanut butter
1 1/4 cup packed light brown sugar
3 Tbs milk
1 Tbs vanilla extract
1 egg
1 1/2 cups all purpose flour
3/4 tps baking soda
3/4 tps salt
1 1/3 cup (8 oz) heath bar bits, divided

Directions:
1. Preheat oven to 375F.
2. Beat shortening with peanut butter, brown sugar, milk and vanilla until blended.
3. Add egg, beat until blended.
4. Add flour, baking soda, and salt. Beat until blended.
5. Stir in 1 cup of the heath toffee bits.
6. Drop teaspoon full onto a baking sheet. Top with some more heath bits.
7. Bake 8 minutes. Do not over bake.
8. Cool on a rack. Makes 3 dozen cookies.


Canape Bread Mold

So I bought a new toy for myself to play with in the kitchen last week. Behold, a canape bread mold.

Canape basically means decorative, one-bite food, or hors d'oeuvres. I like to make these finger foods for gatherings when friends come over. Instead of buying these small breads at the grocery store, I figured I would make them myself. It was extremely easy, and fun as well.


I started off by making the original canape bread recipe provided with the kit. I divided the dough up by 3, and flavored two of them to my liking.

I made a dry pepper salami & cheese bread, a cinnamon sweet bread, and plain canape bread. The salami & cheese one was the best!


Salami & Cheese, Cinnamon, Plain

The mold came in three shapes, a heart, start, and flower. Which will be great for holiday theme!


So here is the plain canape bread recipe:

Ingredients:
1 1/4 Cup warm milk
1/4 Cup melted butter
1 1/4 tps salt
3 to 4 Cup of all-purpose flour
2 Tbs of warm water (115F)
1 package of active dry yeast
1 tps sugar

Directions:
1. Stir together water, sugar and yeast in stand mixer bowl. Let foam for 10 minutes.
2.  Warm milk with butter, add salt. Add to the yeast.
3. Knead on medium for 7 minutes, or until the dough pulls away from the side of bowl. I used 3 1/2 cups of flour.
4. Put in an oiled bowl, let rise for 1 hr.
5. Punch down, divide into three pieces.
6. Flavor them or leave plain. I added 1 tps of cinnamon and 1 Tbs sugar to one piece, and 1/3 cup chopped salami and 1/2 cup cheddar cheese to the other.
7. Shape into logs and place into greased canape bread mold.
8. Let rise for 45 mins.
9. Preheat oven to 375 F.
9. Put caps on, and bake for 30 to 35 minutes.
10. ENJOY!


Thanksgiving Sugar Cookies

I was feeling creative this past week, and wanted to play with royal icing. I wanted to practice my piping skills. I made these.


Aren't they cute? They took a long time to make, since I am so bad at piping. I packaged the finished cookies up and sent them to my mother-in-law today.


This is the sugar cookie recipe I used:


This is the royal icing:
6 oz (3/4 cup) of warm water
5 Tablespoons meringue powder
1 teaspoon cream of tartar
2.25 lb powdered icing sugar
 Directions:
In mixer bowl, pour in the warm water and the meringue powder. Mix it with a whisk by hand until it is frothy and thickened…about 30 seconds.
Add the cream of tartar and mix for 30 seconds more.
Pour in all the icing sugar at once and place the bowl on the mixer.
Using the paddle attachment on the LOWEST speed, mix slowly for a full 10 minutes. Icing will get thick and creamy.
Cover the bowl with a dampened tea-towel to prevent crusting and drying.
Tint with food colors or thin the icing with small amounts of warm water to reach the desired consistency.

I hope you guys find the time and creativity to make them too!


Related Posts Plugin for WordPress, Blogger...